
Getting started in the world of digital photography today can seem overwhelming. Our digital SLRs have more buttons, dials, and menu options than any person can reasonably be expected to keep track of.
Don’t be fooled. If we brush aside the terminology and sales gimmicks, photography today is just as simple as it was 50 years ago; maybe even simpler.
There are really only three things that you need to learn to understand photography. Once you understand these three basic elements, and how they relate to each other, you’ll only be limited by your own creativity and desire to practice. These things are:
- Shutter Speed
- Aperture
- ISO / Film Speed
That’s it. Once you understand how these things affect your images and how they relate to each other, everything else just falls into place. Each of these three elements affects your image in two ways: one is physical, and one is creative.
Shutter Speed
From a mechanical perspective, shutter-speed is pretty simple. I think we all know that in order to make a photo, our camera’s sensor (or film) needs a certain amount of light, and the shutter is simply a door to let light into an otherwise light-proof box where the sensor resides. Shutter Speed is the duration that the shutter is open, and as you’d expect, the longer it stays open, the more light is able to get to the sensor. If the shutter stays open for 2 seconds, twice as much light gets through as if it were only open for 1 second, for example, and 1/2 of a second lets in twice as much light as 1/4.
From a creative perspective, the effect of shutter speed is also pretty easy to understand. Since the sensor is exposed to light for as long as the shutter is open, it records an image of how far the subject moves during that time. A human can move quite a bit during one second, or even a half-second, so a 1 or 1/2 second shutter speed will record a blurry image of a moving person. On the other hand, even the fastest person can’t move very far in 1/1000th of a second, so that shutter speed will be great for stopping action.

Aperture
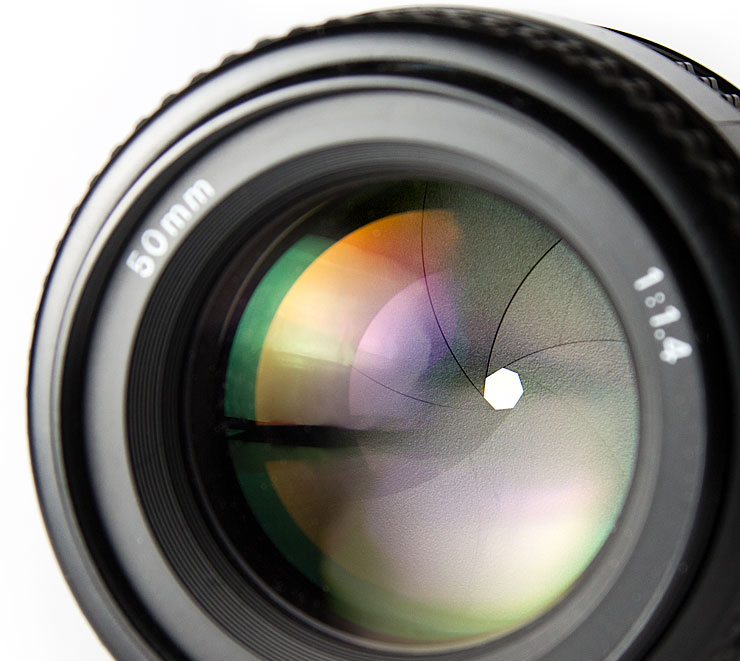
Not as many people are familiar with what a camera’s aperture is, but there’s nothing difficult about it, either, once you see what it is. If you look into an SLR lens, you’ll see a set of blades that form a hole in the middle to let light pass through. That hole is the aperture, and the lens can move those blades to make the hole smaller or larger. The larger the hole, the more light gets through, obviously. Your camera’s aperture control, then, is another way to change how much light gets to the sensor.
Changes in the aperture also change how your photos look. The size of the aperture controls how much of the image appears to be in focus behind and in front of what you’re focused on. For example, suppose that you’re taking a picture of somebody who is standing across the room from you, and you can see trees through the big window behind them. If you take the picture with the lens’ smallest aperture (which lets in the LEAST amount of light), the trees in the background will also be relatively sharp in focus. However, if you take the photo using the lens’s largest aperture, the trees in the background will be very blurry, maybe not even recognizable as trees.
This effect is called “Depth of Field”. When the background gets blurry very quickly as it gets further from the subject, we call it “shallow” depth of field. If most of the picture appears to be in focus, from near to far, we call it “deep” instead. Although I’ve been talking about the background of the subject, the same thing is true of the foreground; in fact, foreground objects go out of focus even more quickly than background when depth of field is shallow. The term “Depth of Field” is frequently shortened to “DoF” on this website and on the internet in general. So to summarize, we can say that the use of small apertures creates greater (deeper) DoF, while using larger apertures creates shallow DoF.

ISO
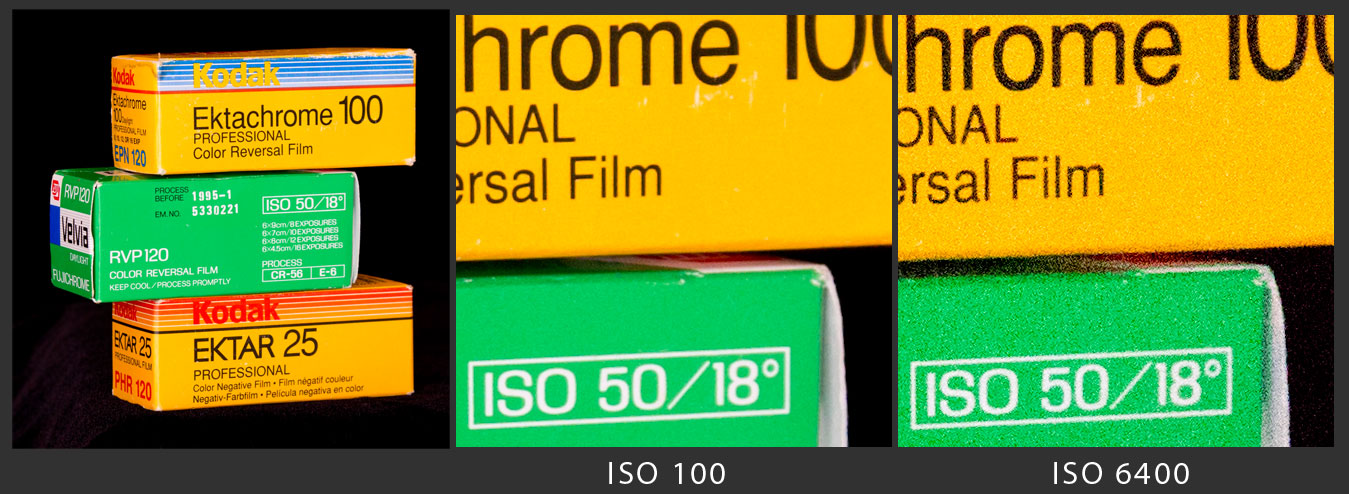
Those of you who used to buy film will recall that you had a choice of different types. In most stores, you could buy 100, 200 and 400 speed films, and in a good camera shop, you could buy many more than that. These numbers are the film’s ISO rating, sometimes called the film-speed (or before the 1990s, it was called the ASA). With film, the higher the number (eg, 400, 800, 1600), the more “sensitive”1 Often, more “sensitive” films were really just developed for longer times, producing more grain and contrast. Shadow detail wouldn’t be improved. the film was to light, so it could be used in darker environments. The lower the number (eg, 50, 100, 200), the less sensitive to light it was, making it better suited to use in bright daylight.
So why wouldn’t people just shoot ISO 1600 film all the time? Unfortunately, higher speed film was also more grainy and had duller colors.
Strangely enough, ISO is almost exactly the same in digital cameras. Most cameras have a base ISO setting of about 100. To increase the apparent sensitivity of the sensor, the camera amplifies the signal 2 This is a pretty gross over-simplification. Some cameras, like Canon, amplify the signal at the sensor, increasing noise there. Other cameras, like some Nikons and Sonys, simply process the images as they are captured at low-ISO, like pushing the exposure slider up in Lightroom. Either way, the process amplifies noise, too, and reduces dynamic range, just like high ISO films did. that the sensor captures, and modern cameras can generally be pushed all the way up to ISO 6400, 12800, 25600 or higher. This gives them the ability to capture photos in pretty low light, but unfortunately, all of that extra amplification also increases the background data from the camera’s electronics. Think about an audio recording of a voice you’ve made where the voice was too quiet… maybe you recorded a video of someone across the room with your phone, or you recorded a lecture from the back row and it’s hard to make out the voice. You can turn up the volume when you play it to make the voice louder, but that also increases the background hiss and other noises from the room, so it’s often still hard to hear.
The same thing is true with a high ISO setting. Shooting at high ISO “turns up the volume” of a small amount of data captured from the sensor, but it also turns up the background noise from the camera’s electronics. The result is a very grainy looking image, usually with dull or inaccurate colors and lower detail resolution. This phenomenon is known as “digital noise”.
Exposure: Working Together
To get a better grip on how these three elements work together to create a photograph, an analogy may be helpful. Think of it this way: taking a photograph is like filling a bucket with water from a hose. If you fill the bucket all the way but don’t overflow, we could say that we have a correct exposure. In photography, getting a correct exposure means that the right amount of light gets to the sensor for the ISO setting, creating a picture that is not too bright or too dark.
The shutter speed is like the valve on the faucet: you turn it on for a little while to let the water flow through, and then turn it off again. (For the sake of the analogy, assume that the valve only turns the water ON or OFF, like the motion-sensor activated faucets in public restrooms.) If you leave it on for too long, the bucket will overflow, but if you turn it off too quickly, it won’t fill up. Similarly, if you use a shutter speed that is too long, too much light will come through and the picture will be too bright, but if you use a shutter speed that’s too short, not enough light will get through and the picture will be too dark.

The aperture is like the size of the hose. If we use a standard garden hose to fill the bucket, it will take more time than if we use a fire hose. Even assuming that the water pressure is the same in each case (and we should, for this analogy), a hose that carries twice as much water will fill the bucket twice as fast. If, on the other hand, you use a tiny hose (like aquarium tubing), it will take quite a while longer to fill up the bucket. Aperture works the same way. If you double the size of the aperture, twice as much light will get through to the sensor in the same amount of time.
The ISO is like the size of the bucket. If you double the size of the bucket, it will take twice as long to fill it with the same size hose OR the same amount of time with a hose twice as big. Similarly, if you lower your ISO from 200 to 100, it takes twice as much light to expose the photo, so you need to double the duration of the shutter speed or double the size of the aperture.
Of course, there are many different ways to fill a bucket: you can use a small hose for a long time, or a big hose for a short time, or a small hose for a small time if you’re filling a small bucket, etc. The same thing is true in photography. There are lots of different ways to correctly expose a photograph, and since each way will also affect how the photo looks, choosing one way over another is part of the creative process.
A Game of Trade-Offs
As you can now understand, photography is a game of trade-offs between these three factors. Suppose you take a photo at a medium aperture, medium shutter speed, and medium ISO and its exposure is correct (fills the bucket), but the motion is a little blurry. We know that to stop action, you need to use a faster shutter speed (don’t leave the water on for so long). But if you ONLY change the shutter speed, then your “bucket” isn’t going to fill up. To make up for the change in shutter speed, you either need to let in more light with a larger aperture (bigger hose) or use a higher ISO (smaller bucket). But if you use a larger aperture, you get a shallower depth-of-field, and therefore, a more blurry background. If you use a higher ISO instead, you get more digital noise. In some cases a blurry background is desirable, so this may be an easy choice.
This article is intended to give you a general understanding of the three most important concepts in photography and their relationship to each other. In the next article, I’ll explain the exact relationship between shutter speeds, apertures, and ISO so that when you change one of them in your camera, you can know instantly how to make up for it by changing another one.
Read the next article in the series: Photography’s Unifying Theory: The F-Stop
Please Comment! If you have questions, I’d be happy to answer them… and I’m always interested to hear whether articles like this are helpful.
