In The Three Basics of Photography, I explained how shutter speed, aperture, and ISO relate to each other using the Bucket Analogy. Now that you’re armed with a general understanding, it’s time to get down to the details that make the information useful in real world applications.
Doubles and Halves
Before we do, though, notice a couple of things that we’ve seen already. First, a common range of ISO settings is 100, 200, 400, 800, and 1600. Second, if you had an old camera with a shutter speed dial, the common series of shutter speeds would include 1/30 , 1/60, 1/125, 1/250, and 1/500 of a second. What do both of these series have in common? Each setting is double or half of the setting next to it on either side (or at least, very close).
This is no accident. A sensor at ISO 200 requires exactly twice as much light for a correct exposure as one set to 400 (ie, 400 is twice as sensitive to light as 200). At the same time, an exposure of 1/30th of a second lets in twice as much light as 1/60th. The same is true of aperture settings: changing from one (full) setting to the next lets in twice as much or half as much light, depending on which way you turn the dial.
In fact, this is the unifying framework of exposure: every setting works in doubles or halves.
The F-Stop
The term “f-stop” is frequently used in two different ways, so let me take a moment to clarify.
In the more specific instance, an f-stop refers to a particular aperture setting, or “f-number”. You might hear someone ask a photographer, “What f-stop are you using?”, and the answer would be a simple f-number, like “I’m at f/8”.
More commonly though, and more importantly for this article, an f-stop is a unit of measurement for exposure: a change of 1 f-stop = a doubling or halving of the amount of light getting to the sensor, or in the case of ISO, the sensitivity of the sensor to light1This is more properly called a “step”, when you’re not talking about aperture, but most professional photographers still use the term “stop” instead.. When used in this general sense, the term is usually shortened to “stop” rather than “f-stop”. For example, a photographer might say “I underexposed by one stop to maintain highlight detail”. This would mean that the photographer cut the amount of light getting to the sensor in half by doing one of three things: 1) reducing the shutter duration by half, 2) reducing the sensitivity of the sensor in half, or 3) reducing the size of the lens aperture by half.
With this in mind, it should start becoming clear how you can adjust any of the three settings but maintain the same exposure; you simply have to make sure that if you remove a stop from one of the three settings, you must add a stop to one of the other two, or conversely, if you add a stop to one setting, you must subtract it somewhere else. To do so, you’ll need an understanding of the three exposure settings.
Shutter Speed
As I just mentioned, the shutter-speed scale on your camera is built on a scale that starts at 30 seconds and is cut in half until it reaches 1/8000th of a second. So, the scale goes like this:

For each step to the right in this scale, the shutter stays open half as long as the previous setting, which means that half as much light gets to the sensor (if everything else stays the same). Of course, 8, 1/15th and 1/125th fudge the numbers slightly so that we can continue with an easy to remember sequence of numbers.
ISO
The ISO scale is also pretty simple to understand. Each time the ISO number doubles, the sensor’s sensitivity doubles, meaning it requires only half as much light to produce the same exposure. Most commonly, the ISO range includes:
However, many old films were rated at lower ISOs, and many digital cameras can shoot at higher ISOs. One of my favorite black and white films was Kodak Technical Pan film, which I usually shot at ISO 12, two stops below ISO 50. The new Canon EOS1DX can be shot with an ISO as high as 102400, but the range above is very common on digital SLRs.

Aperture
Aperture works the same way, but is complicated by the fact that the numbers don’t appear to be doubles and halves of each other. As the numbers get larger, the size of the aperture gets smaller, letting in less light. The standard 2 Larger apertures than f/1.4 exist, but are very expensive. Over 40 years ago, Canon designed an f/0.95 lens, the widest ever in production. Lenses for large format cameras stop down as small as f/64, or even f/256. sequence of f-numbers is:

As with shutter-speed scale above, each step to the right in this sequence cuts the amount of light getting to the sensor in half.
Unfortunately, the f-number naming convention doesn’t make it obvious that f/4 is twice as big as f/5.6 in the same way that ISO 400 is clearly an even multiple of 200 3 The amount of light let through a lens is dependent on two things: the focal length of the lens and the diameter of the aperture opening. Therefore, the f-number = focal length (mm)/ aperture diameter (mm). So, a 100mm lens with an aperture opening of 25mm = f/4 . If you feel like practicing your geometry, you can calculate the area of each aperture for a given lens, and you’ll find that the area doubles from one f-number to the next] . The best thing to do here is spend a little time memorizing the sequence. Once you’ve done that, the rest is much easier. The majority of people will shoot between f/2.8 and f/16 most of the time, so start there; memorizing 6 numbers is manageable [4. If you have a mathematical mind and want some help remembering the entire scale, then then think of the whole scale as a combination of two scales that double: one starting at f/1.4, and one starting at f/2. The f/1.4 scale doubles to give you the f/2.8, f/5.6,f/11, etc. (with decimals being rounded above f/10). The f/2 sequence gives you f/4, f/8, f/16, etc. Combined, you get the whole sequence: f/1.4, f/2, f/2.8, f/4, etc. The important thing to remember that doubling an f-number does NOT give you the next full-stop in the sequence . Make yourself flash-cards, if necessary.
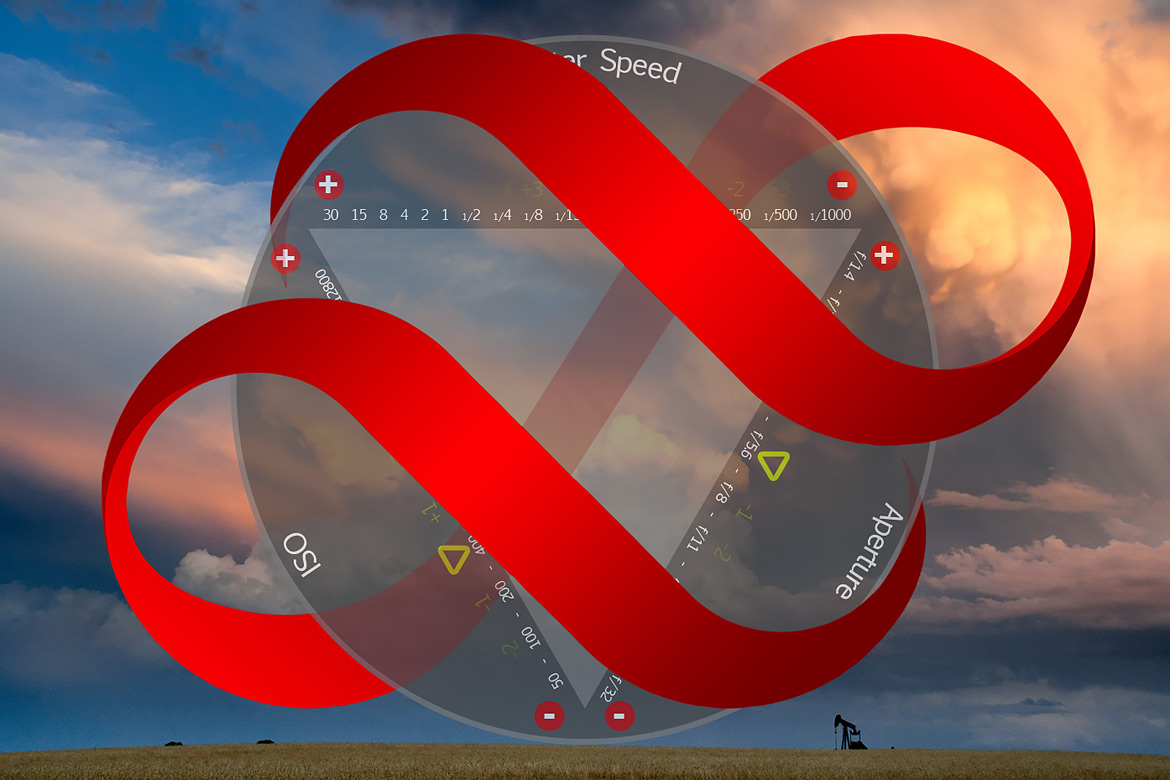
Putting it Together
The diagram below may look complicated at first glance, but a closer look reveals that it’s just the three scales above combined into a triangle. Each scale has a red (+) or (-) at the end to remind you which direction would make your picture lighter (+) and which would make it darker (-) if the other settings stayed the same.
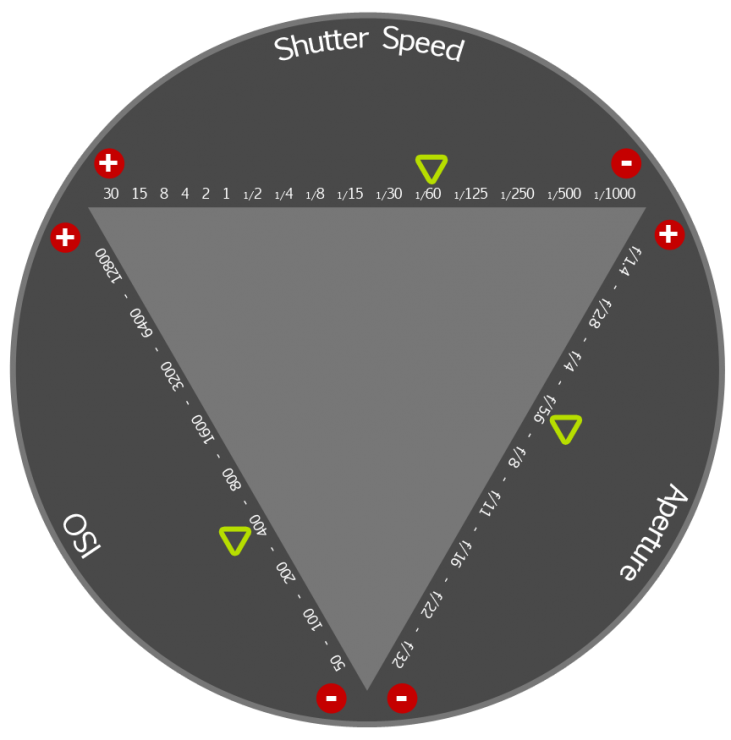
Once you know the scales and how they’re related, they’re easy to manipulate. Take a look at the combined scales above; the exposure indicated is 1/60th sec. at f/5.6, ISO 400. Suppose you know that this exposure is giving you good results for luminance (it looks bright enough but not too bright) 4 I’ll discuss instances when you aren’t getting the right exposure to begin with in another article. , but you’re getting motion blur. You decide to use a faster shutter speed to stop the action, and change your shutter speed to 1/250th sec (-2). This means that you have to make up for it on the other two scales, either by adding two stops to your ISO or Aperture, or adding one stop to each.
If you’re shooting in shutter-priority, the camera will automatically make the adjustment mentioned above by adding two stops with the aperture. But what if you’re shooting at 1/60th sec at f/2.8, ISO400 with a 100mm f/2.8 lens, and you need to stop motion? In shutter priority mode, your camera would normally try to open the aperture two more stops… but your lens doesn’t open any further than f/2.8! If you adjust the shutter speed to 1/250th sec., something will start blinking in your viewfinder to let you know there’s an exposure problem. But with the diagram above in mind, you know what to do: adjust the ISO from 400 to 1600 (+2) 5 You camera will do this for you if you shoot with your ISO set to automatic, but I never do… I like to keep strict control over my digital noise levels. . Alternately, you can switch to a lens that opens up to f/1.4.
And, if you’ve read the first part of this series, you should quickly be able to figure out how to make adjustments to get more motion blur, more or less depth of field, and less digital noise.
But Wait… My Camera Is Different!
Those of you who are hands-on learners (or who simply have a good memory) will have already noticed that something is amiss. If you scroll through the shutter speeds, apertures, and ISO settings on your camera, you’ll notice that the settings listed above are not the only ones there! This is true. Full f-stops are not the smallest unit of measure when setting exposure. Modern cameras allow you to adjust your exposure in either 1/2 or 1/3 stops, so you’ll see either one or two extra settings between the ones that I’ve already discussed.
All digital SLRs that I’m familiar with allow you to choose whether you want the camera to use 1/2 or 1/3rd stops. If you’re relatively new to photography, it’s worth taking a moment to look through your menus (and manual, if necessary) and switch to 1/2 stops. Not only does this dramatically reduce the number of settings you have to get familiar with, but it makes adjustments faster and more intuitive. You’ll keep using the exact same system as listed above, but simply add in half-way points along each scale: between 1/15th sec and 1/30th sec is 1/20th, for example. If you’ve memorized the list of apertures we’ve discussed already, then you’ll always know when you’re dealing with half-stop apertures or the full-stop apertures they fall between (eg, f4.5 falls between f4 and f/5.6).
Practice
Getting used to working with these scales can take a little time, but this is the most important building block to taking total control of your photography. Perhaps the greatest thing about it is that once you learn it, it will be useful for as long as you keep taking pictures. These three scales were in use 50 years ago, and may be in use for another 50, so even if cameras change every year, your understanding of them should transfer easily. So, switch your camera out of automatic mode, and at the very least, switch to aperture or shutter priority, turn off automatic ISO, and start practicing.
In the next article, I’ll explain how to use this knowledge to correct bad exposures, rather than just switching from one correct exposure to an equivalent one. As always, comments are appreciated!
