Diagram of Exposure and Plumbing Analogy
In this diagram I used rigid pipes rather than hoses (mostly because they're easier to draw), but the idea is the same.

The Three Basics of Photography

Spiral Staircase Light
Matthew Gore | Light And Matter

Getting started in the world of digital photography today can seem overwhelming. Our digital SLRs have more buttons, dials, and menu options than any person can reasonably be expected to keep track of.

Don’t be fooled. If we brush aside the terminology and sales gimmicks, photography today is just as simple as it was 50 years ago; maybe even simpler.

There are really only three things that you need to learn to understand photography. Once you understand these three basic elements, and how they relate to each other, you’ll only be limited by your own creativity and desire to practice. These things are:

  • Shutter Speed
  • Aperture
  • ISO / Film Speed

That’s it. Once you understand how these things affect your images and how they relate to each other, everything else just falls into place. Each of these three elements affects your image in two ways: one is physical, and one is creative.

Shutter Speed

From a mechanical perspective, shutter-speed is pretty simple. I think we all know that in order to make a photo, our camera’s sensor (or film) needs a certain amount of light, and the shutter is simply a door to let light into an otherwise light-proof box where the sensor resides. Shutter Speed is the duration that the shutter is open, and as you’d expect, the longer it stays open, the more light is able to get to the sensor. If the shutter stays open for 2 seconds, twice as much light gets through as if it were only open for 1 second, for example, and 1/2 of a second lets in twice as much light as 1/4.

From a creative perspective, the effect of shutter speed is also pretty easy to understand. Since the sensor is exposed to light for as long as the shutter is open, it records an image of how far the subject moves during that time. A human can move quite a bit during one second, or even a half-second, so a 1 or 1/2 second shutter speed will record a blurry image of a moving person. On the other hand, even the fastest person can’t move very far in 1/1000th of a second, so that shutter speed will be great for stopping action.
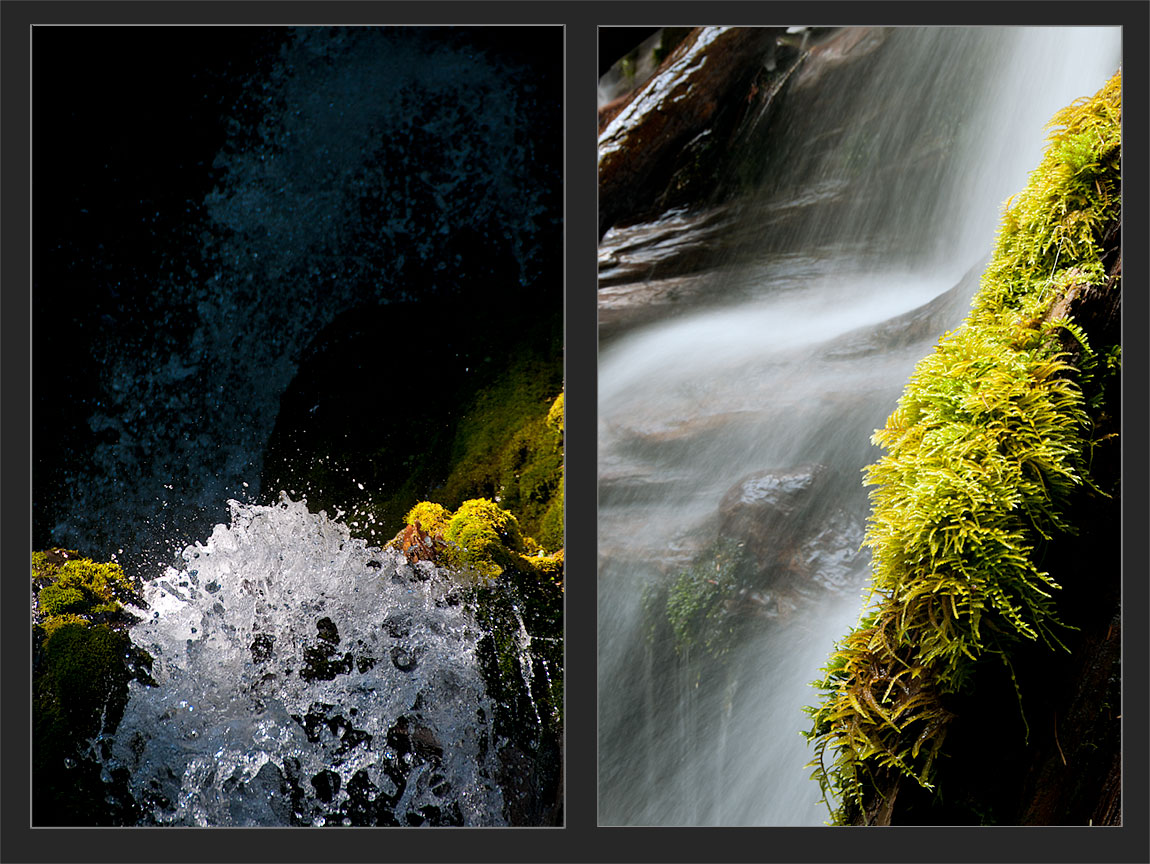
Examples of Shutter Speed
Matthew Gore | Light And Matter These two photos of moving water make use of different shutter speeds. The photo on the left was shot at 1/750th sec. to stop the motion, while the photo on the right used a 1/3rd sec. shutter speed to blur the water. (Click to Enlarge)

Aperture

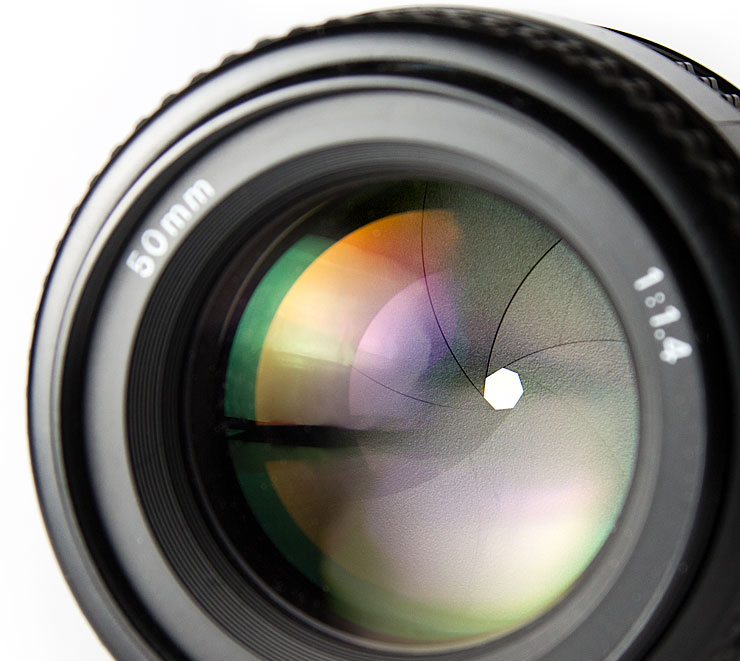
Nikon 50mm f/22 Aperture Example
Matthew Gore | Light And Matter The aperture of this lens is at it’s smallest setting, but can still easily be seen in the center of the lens. The 8 blades that form the aperture can also been seen.

Not as many people are familiar with what a camera’s aperture is, but there’s nothing difficult about it, either, once you see what it is. If you look into an SLR lens, you’ll see a set of blades that form a hole in the middle to let light pass through. That hole is the aperture, and the lens can move those blades to make the hole smaller or larger. The larger the hole, the more light gets through, obviously. Your camera’s aperture control, then, is another way to change how much light gets to the sensor.

Changes in the aperture also change how your photos look. The size of the aperture controls how much of the image appears to be in focus behind and in front of what you’re focused on. For example, suppose that you’re taking a picture of somebody who is standing across the room from you, and you can see trees through the big window behind them. If you take the picture with the lens’ smallest aperture (which lets in the LEAST amount of light), the trees in the background will also be relatively sharp in focus. However, if you take the photo using the lens’s largest aperture, the trees in the background will be very blurry, maybe not even recognizable as trees.

This effect is called “Depth of Field”. When the background gets blurry very quickly as it gets further from the subject, we call it “shallow” depth of field.  If most of the picture appears to be in focus, from near to far, we call it “deep” instead. Although I’ve been talking about the background of the subject, the same thing is true of the foreground; in fact, foreground objects go out of focus even more quickly than background when depth of field is shallow. The term “Depth of Field” is frequently shortened to “DoF” on this website and on the internet in general. So to summarize, we can say that the use of small apertures creates greater (deeper) DoF, while using larger apertures creates shallow DoF.
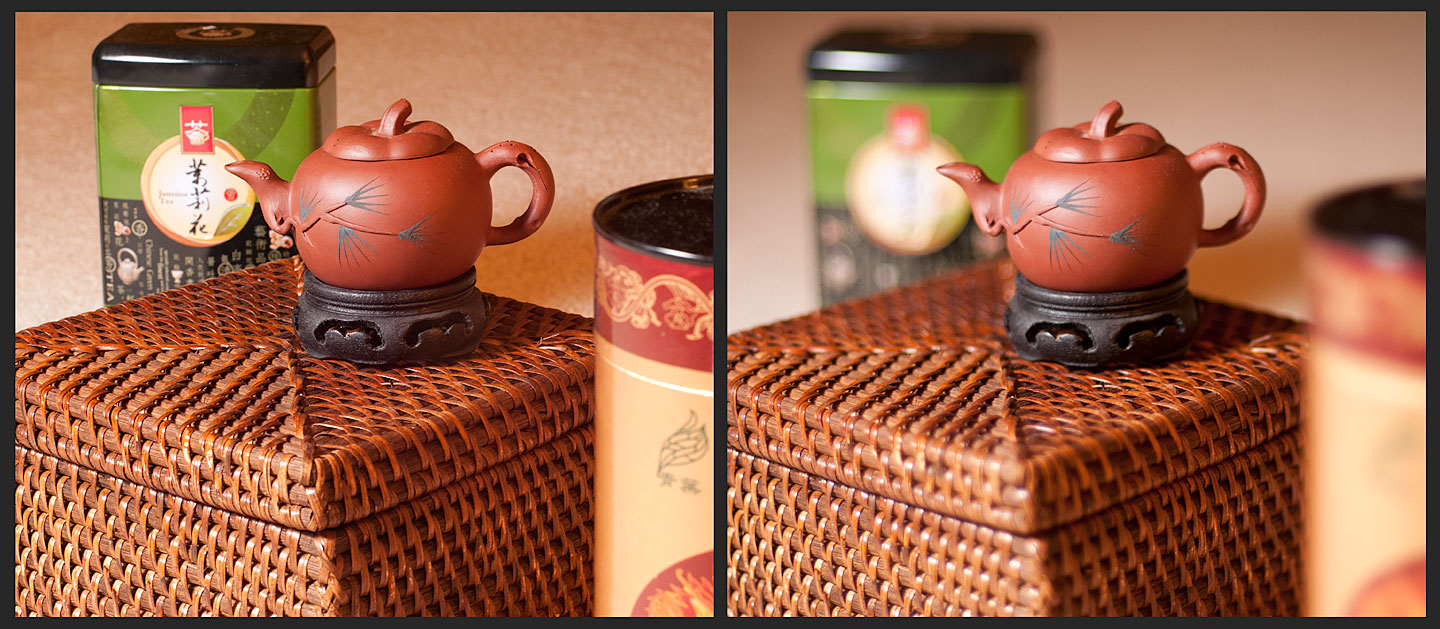
Aperture creates differences in depth of field
Matthew Gore | Light And Matter In both pictures, the camera is focused on the front face of the teapot, and both are sharp there. However, on the left, the aperture was set to a very small size, so the containers behind and in front are close to being in focus, too. On the right, though, a large aperture was used, so the containers are very blurry.

ISO

Those of you who used to buy film will recall that you had a choice of different types. In most stores, you could buy 100, 200 and 400 speed films, and in a good camera shop, you could buy many more than that. These numbers are the film’s ISO rating, sometimes called the film-speed (or before the 1990s, it was called the ASA). With film, the higher the number (eg, 400, 800, 1600), the more “sensitive”1 Often, more “sensitive” films were really just developed for longer times, producing more grain and contrast. Shadow detail wouldn’t be improved. the film was to light, so it could be used in darker environments. The lower the number (eg, 50, 100, 200), the less sensitive to light it was, making it better suited to use in bright daylight.

So why wouldn’t people just shoot ISO 1600 film all the time? Unfortunately, higher speed film was also more grainy and had duller colors.

Strangely enough, ISO is almost exactly the same in digital cameras. Most cameras have a base ISO setting of about 100. To increase the apparent sensitivity of the sensor, the camera amplifies the signal 2 This is a pretty gross over-simplification. Some cameras, like Canon, amplify the signal at the sensor, increasing noise there. Other cameras, like some Nikons and Sonys, simply process the images as they are captured at low-ISO, like pushing the exposure slider up in Lightroom. Either way, the process amplifies noise, too, and reduces dynamic range, just like high ISO films did. that the sensor captures, and modern cameras can generally be pushed all the way up to ISO 6400, 12800, 25600 or higher. This gives them the ability to capture photos in pretty low light, but unfortunately, all of that extra amplification also increases the background data from the camera’s electronics. Think about an audio recording of a voice you’ve made where the voice was too quiet… maybe you recorded a video of someone across the room with your phone, or you recorded a lecture from the back row and it’s hard to make out the voice. You can turn up the volume when you play it to make the voice louder, but that also increases the background hiss and other noises from the room, so it’s often still hard to hear.

The same thing is true with a high ISO setting. Shooting at high ISO “turns up the volume” of a small amount of data captured from the sensor, but it also turns up the background noise from the camera’s electronics. The result is a very grainy looking image, usually with  dull or inaccurate colors and lower detail resolution. This phenomenon is known as “digital noise”.
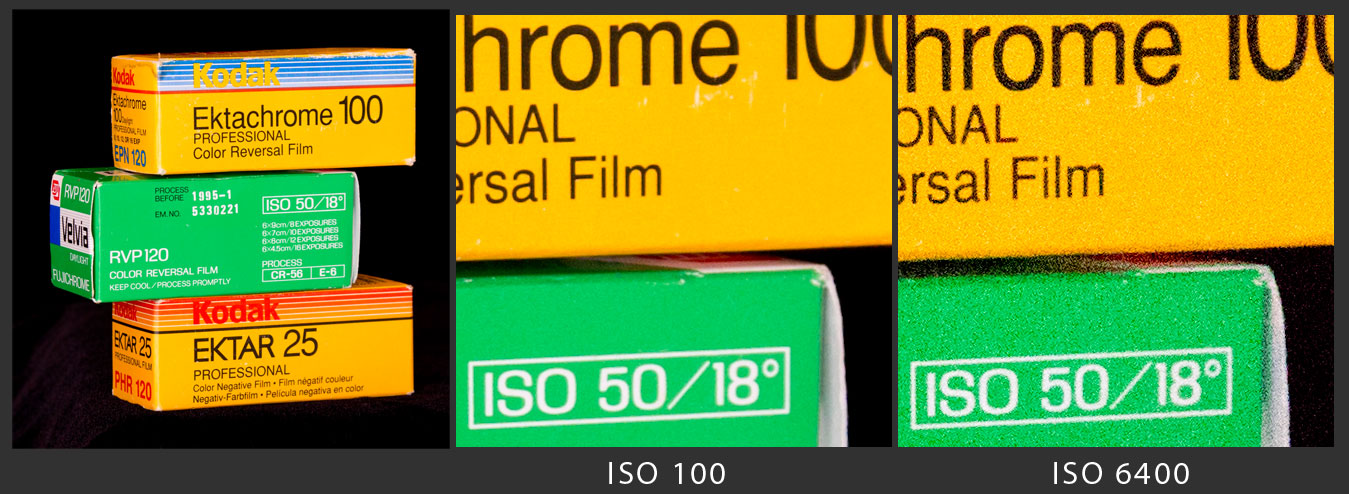
ISO and noise example
Matthew Gore | Light And Matter I pulled three boxes of film out of my freezer: ISO 25, 50, and 100, as you can see on the left. In the middle and right, I’ve enlarged the image to 100%, shot at ISO 100 and ISO 6400, using no noise reduction or sharpening. As you can see, the high ISO has resulted in a very rough, grainy image. (Click for full size)

Exposure: Working Together

To get a better grip on how these three elements work together to create a photograph, an analogy may be helpful. Think of it this way: taking a photograph is like filling a bucket with water from a hose. If you fill the bucket all the way but don’t overflow, we could say that we have a correct exposure. In photography, getting a correct exposure means that the right amount of light gets to the sensor for the ISO setting, creating a picture that is not too bright or too dark.

The shutter speed is like the valve on the faucet: you turn it on for a little while to let the water flow through, and then turn it off again. (For the sake of the analogy, assume that the valve only turns the water ON or OFF, like the motion-sensor activated faucets in public restrooms.) If you leave it on for too long, the bucket will overflow, but if you turn it off too quickly, it won’t fill up. Similarly, if you use a shutter speed that is too long, too much light will come through and the picture will be too bright, but if you use a shutter speed that’s too short, not enough light will get through and the picture will be too dark.
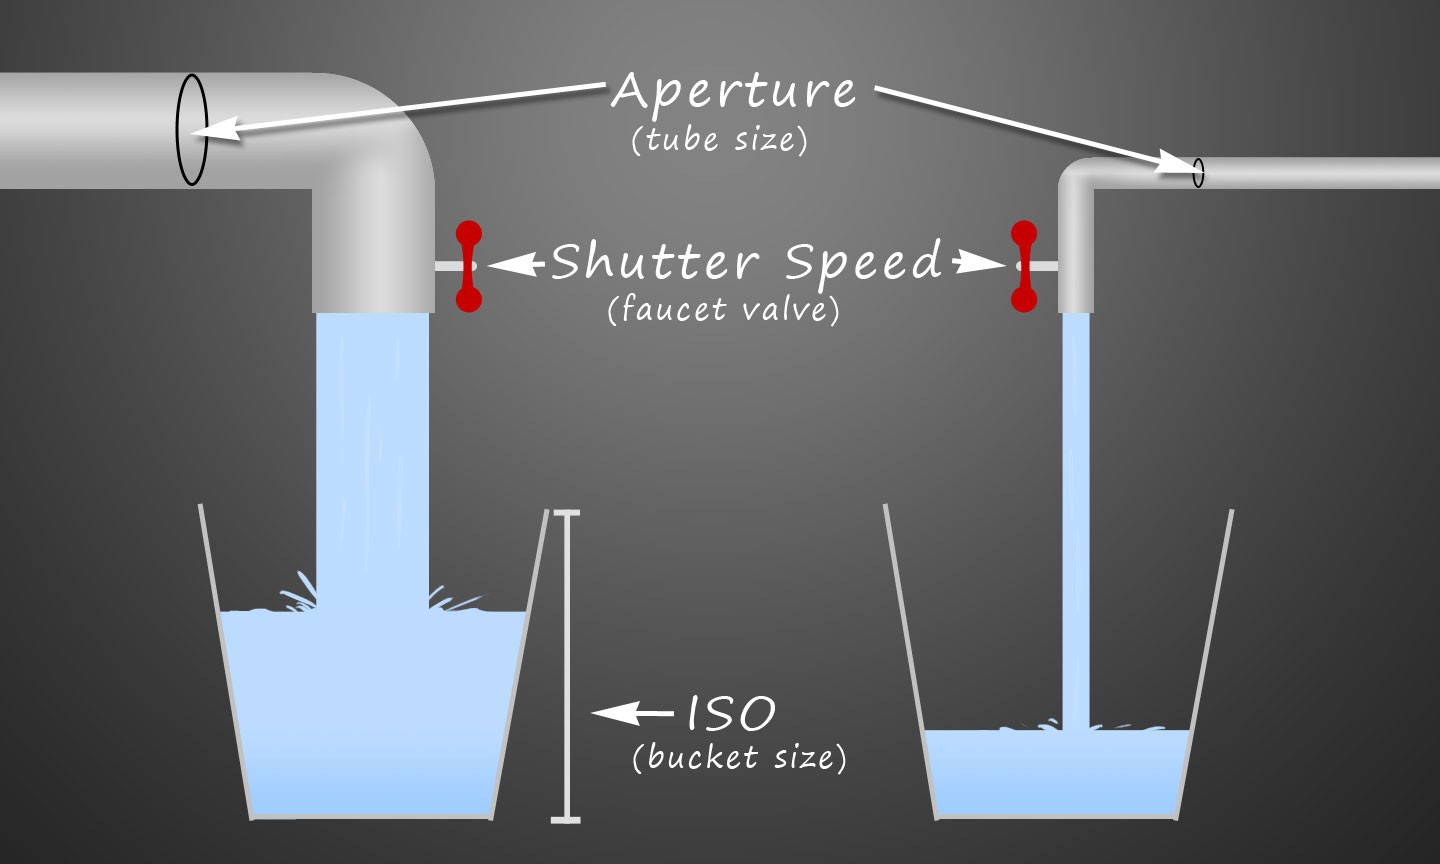
Diagram of Exposure and Plumbing Analogy
Matthew Gore | Light And Matter In this diagram I used rigid pipes rather than hoses (mostly because they’re easier to draw), but the idea is the same.

The aperture is like the size of the hose. If we use a standard garden hose to fill the bucket, it will take more time than if we use a fire hose. Even assuming that the water pressure is the same in each case (and we should, for this analogy), a hose that carries twice as much water will fill the bucket twice as fast. If, on the other hand, you use a tiny hose (like aquarium tubing), it will take quite a while longer to fill up the bucket. Aperture works the same way. If you double the size of the aperture, twice as much light will get through to the sensor in the same amount of time.

The ISO is like the size of the bucket. If you double the size of the bucket, it will take twice as long to fill it with the same size hose OR the same amount of time with a hose twice as big. Similarly, if you lower your ISO from 200 to 100, it takes twice as much light to expose the photo, so you need to double the duration of the shutter speed or double the size of the aperture.

Of course, there are many different ways to fill a bucket: you can use a small hose for a long time, or a big hose for a short time, or a small hose for a small time if you’re filling a small bucket, etc. The same thing is true in photography. There are lots of different ways to correctly expose a photograph, and since each way will also affect how the photo looks, choosing one way over another is part of the creative process.

A Game of Trade-Offs

As you can now understand, photography is a game of trade-offs between these three factors. Suppose you take a photo at a medium aperture, medium shutter speed, and medium ISO and its exposure is correct (fills the bucket), but the motion is a little blurry. We know that to stop action, you need to use a faster shutter speed (don’t leave the water on for so long). But if you ONLY change the shutter speed, then your “bucket” isn’t going to fill up. To make up for the change in shutter speed, you either need to let in more light with a larger aperture (bigger hose) or use a higher ISO (smaller bucket). But if you use a larger aperture, you get a shallower depth-of-field, and therefore, a more blurry background. If you use a higher ISO instead, you get more digital noise. In some cases a blurry background is desirable, so this may be an easy choice.

This article is intended to give you a general understanding of the three most important concepts in photography and their relationship to each other. In the next article, I’ll explain the exact relationship between shutter speeds, apertures, and ISO so that when you change one of them in your camera, you can know instantly how to make up for it by changing another one.

Read the next article in the series: Photography’s Unifying Theory: The F-Stop

Please Comment! If you have questions, I’d be happy to answer them… and I’m always interested to hear whether articles like this are helpful.

Editor-in-Chief
Subscribe
Notify of
guest

75 Comments
Inline Feedbacks
View all comments
Abe

ISO and noise do not work as you explain. I do understand it’s easy to explain like this, but taking cheap shortcuts will cause issues later on.

Almost all the noise in photography comes from the nature of light itself – it’s called photon shot noise – if you use a small exposure (which itself is a combination of f-stop, exposure time and scene luminance – ISO has nothing to do with it), you’ll see plenty of noise because the statistical variation of photons becomes more apparent. Camera’s or image sensor’s electronic noise is very minor and doesn’t really play a part unless we go to extremely low exposures with only a few photons reaching the relevant pixels.

Also, increasing the ISO itself doesn’t increase noise – for almost all cameras it actually reduces it slightly – shoot two images (using raw) at the same exposure and different ISOs and view them at the same lightness and the higher ISO image is normally a little cleaner – the difference is most visible with ISO 100 vs ISO 1600 or more.

Also changing the ISO does not change the sensitivity of the sensor in any way – ISO changes the lightness of the picture if shooting JPG. The sensitivity of the sensor is constant. (in the video you didn’t use the word “apparent” which kind of saves the article.)

Maybe fix the article (and video)? Even beginners deserve correct information.

Joshua Schoonmaker

im in photogtraphy class right now and yeah we had to watch your video but it really helped because i didnt know there was high numbers of ISO and i did not know ISO and aperture affects the shutter speed and so on so i think it was useful information THANKS!

Jen

What a great analogy! This really helped me understand the different components of the picture to consider. ISO is the hard one for me to grasp…this article helped….thanks!

Aruna

Hey Matthew,

I have a new found interest in photography. I was browsing the web for articles on photography when i found this one. I thought it was very written beautifully with very easy to understand language in place of technical jargon that i encountered on many sites. Thank you!

Robert Michael Smith

Just getting back into photography so I’m reading various articles as refreshers and to help me get beyond where I left off. I found the clarity of this article to be outstanding and particularly liked the analogies. Top marks!

Britt

Hi Matthew!

I’m just getting into photography and have been struggling so much with understanding exposure. This article is by far the best explanation of ISO, aperture and shutter speed that I’ve seen!
Thank you so much,

-Britt

Surendra Moghe

Hi Matthew Gore
I came across and read this article for first time. I had point and shoot camera but never bothered theory behind. Now that I am gaining interest in photography after reading your nice article I may try another camera/s. What I liked the most in your article is the way you have put the theory illustrating simple physics analogies which I learned way back 40yrs, they really knocked my college days memories. Now that I retired from job but never mind your article refreshed me to do something creative again. Thanks a lot. Regards

ElsinaJo

Thanks Matthew. I love your site and this article was a helpful reminder. I love your analogies. I used to photograph in the days of film and darkrooms. I still have my Nikon FM2. Loved black and white work, but found colour photography very demoralising, as you were dependent on on photolabs and the status of their chemicals and quality of their processing, so it was hard to learn from the results. Anyway, have just been lent a friend’s Canon eos 500D. A basic camera, but good enough for now, although I’d like something with a faster frame rate for continuous shooting eventually. Looking forward to experimenting and learning from instant results. And reading the rest of your articles.
BTW, I’m an editor and just happened to notice a typo – you have says where it should be stays in the 4th line under shutter speed.

tutul

Hallo Matthew –

Very informative for novice DSLR users.
I have ‘Canon-1200D’ DSLR with 2 lenses. But I am planing to buy a ‘Sony Alpha SLT-A58Y’ DSLR with 2 lanes.

Can you please give some ideas.

Thanks,
— tutul

Roger Clark

Hello Matt,
Overall a nice article (your video too), except there is one flaw perpuating the false idea that ISO changes the sensor’s sensitivity. The sensors in digital cameras have only one sensitivity given by the quantum efficiency of the device (around 40 to 50% in digital cameras). Changing sensitivity does not change the amount of light collected by the sensor. Your analogy with water pipes and valves is good, but the bucket size as an analogy for ISO is not. What happens in a digital camera is more like the following. The lens aperture collects a certain amount of light for a given exposure time, and if you put the camer in manual mode and expose for the same time with the same aperture and change ISO from say 100 to 32000, the same amount of light is still recorded by the sensor. The only thing that changes is what the camera does with the signal after the sensor: it amplifies and digitizes a different range for each ISO. This makes the illusion of sensitivity because it changes the numbers in the digital file, but does not really change the light captured. This has implications, especially when pushing extremes as in low light or night photography. See: http://www.clarkvision.com/articles/iso/
Roger Clark

Girish

Hi Matthew,

This is a great write up. I wanted to ask about Macro lenses, and how that is chosen.

Thank you,

-GK

Dana

Finally! Someone who can explain this stuff in a way that really hits home. First, I came across the video explanation on youtube, after watching countless others. Then I followed the link to your site. Thanks so much for doing such an awesome job with the video and article. I will definitely explore your site in depth.

Sara Hellner

Thank you! Very good and easy to understand… I have worked with pictures and video’s for years on a very amateur basis, letting the camera do most of the job.. bought a new more advanced lens yesterday ( Canon EF 70-200mm f/2.8L IS II USM) wanting to take my photography to the next level. As I shot mostly animals, and a lot of time in motion, this is critical for me to understand…. I am now very inspired and will go out practice.. :-)

Rohan

Really very useful. Good for beginners.
It would be really helpful, if you can provide the .pdf copy of the contents.

Dusty

V interesting , V useful .

Joe

Thanks!! This was very helpful. Trying to bed down the basic of photography to eventually start with astrophotography.

pe2rox

Thank you so much for this. I found it very helpful and very encouraging to new photographers. I love your “calming” approach to teaching. #Bless

pe2rox

Thank you so much for this site. It’s very helpful and encourages new photographers! God bless.

Naresh

Really helped a lot to capture image with proper usage of 3 basic factors in a proportion.

Jim

Great video on the relationship between ISO Aperture and Shutter Speed. Unfortunately the sound effects and music let it down.

Thanks

Diler

I’m lucky to find such a great and simple explanation : )

Nasser

Simply brilliant, well done and many thanks. Nasser

Adam

You rock man! Loved the video on Vimeo you need open a camera store 10x better than bh

bilge

Great video and article, thank you!

Lordshot

I want to properly learn how to use my SAmsung WB 150F its a pint and shoot camera but more like of a compact SLR.. please i need help for the proper settings please

Harry Turner

Matthew

Your video The Three Basics of Photography is brilliant. It is straight forward, concise and explains the fstop, shutter speed, ISO relationship in a very easy to understand manner. Your use of graphics to explain the relationship is inspired.

I have been teaching basic digital photography evenings at a local college for years. This relationship is central to good photography and can be challenging to teach in a way that all can understand. Now at the end of the evening when I teach exposure I will be providing the link to your video to my classes. It will be a valuable asset that will further instill the information I cover in class.

Together we shall get them through.

Kudos and thanks

Harry

Stephanie

This was so helpful! I love the video version of it, really let the knowledge sink in and explained in a way so that I could absorb the concept instead of just terminology.

lucia

great blog! congrats!

Sergio Bello

Thanks so much, you are explaining easier with clear examples the Camera SLR functions…I use a 35mm film SRL

Rich

Matthew, Thanks for make it easy to understand. This has by far been the best i have come across. Thank you!


Luis Silva

Muy util el articulo LOS TRES FUNDAMENTOS DE LA FOTOGRAFIA, este articulo sirve de guia para los fotografos aficionados

Sandor

Hi Matthew,

I came across the video of this post on Gizmodo. I recently started a photography course so this was a good refresher for me. Most of the things explained in the first 3 lessons were explained in 9 minutes.

Only one thing I’m missing though…
For shutter speed and aperture you explain in what situations you can/will/should use them. Freeze motion and/or blur background. Only for the ISO you don’t provide that explanation.

in my course it was explained at which lighting types you can typically use which ISO. 100 for bright sunny, 200 for sun and clouds, 400 clouds/insight, 800 insight/dusk etc…..

I know it’s not an exact science but it helped me in quickly deciding the basic ISO setting in any situation and I think that piece of info would make the video even better for beginning photographers.

After watching the video I’ve shared it with my fellow student so they can use it as a refresher too!

Thanks!

Regards,
Sandor
Rotterdam, Netherlands

Moko M.

Wow, you are a genius in explaining the basics. All the time I have spent trying to understand the basic dynamics of ISO and shutter speed. I’m so happy I found this sight, im seriously ecstatic. I’m eager and excited to read more.
Thank you

weng

HI,  i have T2i with EF-S 18-55mm lens i’ve been looking on how to make a bokeh using this camera and lens. I am new to dslr and not really know what im doing. Is it possible if you can teach me how to do bokeh with this lens? I wil appreciate it.

weng

Thnks for the  recommendation Matthew, i will keep that in mind and thanks for the step-by-step lesson to do bokeh. I cannot wait wait to go outside to try it. I’ve been following your site for a week or so and foudt it very helpful thats why I decided to join. Also your site helped me decide what camera to buy. More power!

Erika

wow this was literally the easiest explanation ever, i’ve been searching all over the web and it was extremely overwhelming,it was either too boring, or very difficult to understand, i have the worst time paying attention so half of the time i never finish reading anything. but this was great! ^.^ im deff going to stick to this site! very good!

Jasmine

I just stumbled across this website as I was doing research on which camera to buy. After MUCH agonizing over whether to buy a Canon T2i or T3i, I finally decided on the T3i (the price difference was under 100 dollars on Amazon, so I figured I might as well!) I am looking forward to delving into the DSLR world and will be coming back to your website often. Keep up the great work!
Jasmine

Janet Huff

Thanks. This is the clearest explanation I’ve ever seen. I can’t say that I fully ‘get it’ yet, but I think that my efforts to master these 3 components of photography will be far more successful now, thanks to your analogies! I am encouraged because for the first time I can ‘see’ how it works.

Bill Minton

If you are new to all of the concepts Matthew is covering, I’d suggest playing with an SLR simulator like the one at http://camerasim.com/camera-simulator.html

Set the lighting to “Bright Indoors” for example, and adjust your shutter speed to stop the pinwheel (about 1/250) and notice how the picture darkens. You can then increase ISO to brighten the photo up, but that introduces noise. Be sure to pay attention to the mode the camera is in shutter priority, aperture priority, etc.

I found using that taught me much more quickly than reading guide after guide and tutorial after tutorial. Matthew does a fantastic job explaining things (look at his posts on histograms and raw vs jpg), but as they say, a picture is worth a thousand words. :-)

Gary

Have been playing around with my 30D and this article refreshed what was some where buried in my head i haope you fine the time to follow up with your next article. The hurricane really set many of us back here on long island also, best gary

Bill Minton

It’s probably just me, but I’m still struggling w/the paragraph that states:

“The ISO is like the size of the bucket. If you double the size of the bucket, it will take twice as long to fill it with the same size hose OR the same amount of time with a hose twice as big. Similarly, if you lower your ISO from 200 to 100, it takes twice as much light to expose the photo, so you need to double the duration of the shutter speed or double the size of the aperture.”

Beginning with “Similarly…” is where I lose it. If ISO is the size of the bucket, and it’s going from 200 to 100 (being cut in half), then it would seem counter intuitive that twice the light (twice the water) would be needed to fill it. I understand actual photography portion, it just doesn’t seem like the bucket size analogy fits there.

Again, it’s probably just me being slow. I’ll think about it some more.

Dan Montgomery

Many thanks. I will use this with my middle school photography club.

Dan Montgomery

Thanks. We’re talking 20-30 11-, 12- and 13-year-olds, so I need all the luck I can get. But it’s a blast.

Daniel

Very helpful.. Your diagrams, analogies, and explanations are very easy to translate, even for someone as new to photography as myself.. I look forward to reading the follow up to this article.. Thank you

Alfred Lopez

True story: I was asked to do a photography workshop here at work so that night I was trying to fall asleep and planning one of the things I was going to “workshop” about. I finally had it all in my head. When I woke up the following morning I saw this post. Which is about 98% of what I was going to present down to the text! So, I was wondering whether you were doing the “Dreamscape” or “Inception” thing the night before. :-)

The workshop is tonight at 6pm.

Troy

THANKS.  I'VE BEEN THINKING OF GOING DIGITAL.  THE BASICS ARE THE SAME AS FILM.  I'M STILL INTIMIDATED BUT I WILL MANAGE.
TROY

Mike Scott

I love that bucket diagram. I’ve never seen it explained better.

Suzy Richman

Very clear and helpful! Thanks.

Lisa Compton

Thanks so much for making this so easy to understand! I have felt really stupid having to ask questions about these things, you have given fantastic examples of what you are explaining. Thank you!