
In the Snow
One of the hardest situations for photographers to deal with when they’re making the transition from point-and-shoot to controlling their own exposure is shooting in the snow, or any other situation in which a significant part of the scene is white. Since reflective light meters have no way to know whether you’re taking a picture of something white in dim light or grey in bright light, for example, they apply a pre-set standard: they assume that you’re taking a picture of something middle grey (about 18%, historically) and provide an exposure that will make your photo mostly grey.
While this works remarkably well most of the time, it fails when most of the metered tones are not supposed to be grey, as is the case when most of the scene is snow.


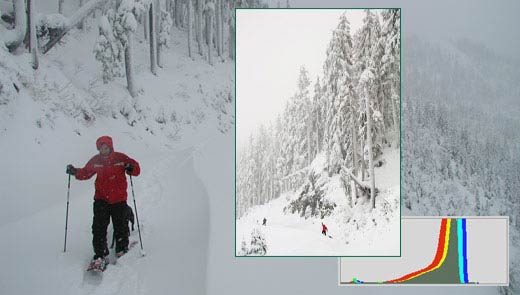
A quick look at the histogram of this shot shows why the tones are all darker than expected. The portion of the histogram that would normally contain the brightest tones is completely empty.
Although this photo was taken on a grey day, it was still mid-afternoon, and the light was very diffuse, filling in shadows and crating a very low-contrast scene. This scene would have been a great candidate for ETTR regardless, but to get more natural tones in the snow, this photo needed at least a full stop of additional exposure.
As I recall, I added about 1.5 stops of exposure compensation. Normally I’d add two stops in the snow, but it was such a grey day that I thought it would be acceptable if there were no pure whites, and I wanted to maintain as much highlight detail as possible.


As a result of using exposure compensation, the highlight tones were much brighter and more accurate, and more shadow detail was captured. However, the shadows, as captured, were very washed out (ie, brighter than they should have been). Darkening the shadows with a curves adjustment is very simple, though, and added some contrast into the image. Though this was really just a snapshot, it ends up being a pretty faithful reproduction of the scene, and shows off the delicate detail and tonalities in the trees and mountain.
As a general rule, then, you should over-expose in the snow. However, if your shot has something dark in the center and you’re shooting with center-weighted metering, or if there is otherwise a mix of light and dark elements, then the meter might give you a more accurate exposure, so it’s very important to continue checking your histogram and adjusting your exposure to make sure that you’re not over-exposing.
Bright Clouds
Unless the sky makes up a significant portion of your image, capturing cloud detail can be very difficult. This is particularly true if your subject is in shadow. A correct exposure for a darker subject or foreground often leaves the sky blown out, which is quickly apparent with a glance at the histogram.

Unfortunately, exposing for the cloud detail often leaves the subject mired in noisy shadows. Good post processing can frequently bring up that detail, but it is usually at the cost of sharpness and smooth tonal transitions.

As long as you’re able to detect the problem, though, you put yourself in the position to be able to work out a solution. In the days of film photography, this usually meant the use of a graduated neutral density filter, and some photographers still enjoy working with them. More commonly though, multiple exposures are shot and then combined using HDR software (easier) or manual masks (sometimes better quality).
The method you choose is ultimately a choice of artistic preference; each has its drawbacks and benefits. Whichever you choose, you’ll need to use your histogram to make sure that you capture at least one image which has no clipped highlights, and at least one which has sufficient shadow detail.
When Clipping is Acceptable

Part three of this series contained a photo shot on a white background which I had overexposed to make the backdrop as clean and smooth as possible. When white is overexposed, all texture and hue is lost, as you’ll recall. This technique is also important in portraiture, as can be seen in the work of artists such as Richard Avedon and the slightly less well known Andrew Zuckerman (Google his images if you’re not familiar… they’re worth seeing).
When many photographers first attempt shots on white, though, they are disappointed to get photos with uneven grey, textured backgrounds and under-exposed subjects. This occurs for the same reasons that it does in the snow, as we saw above. A quick check of the histogram will show that the tones that should be slammed to the right at 255 are lingering around in the middle right of the histogram.
Sometimes this can be fixed by filling the frame as much as possible with the subject or using your camera’s spot-meter on the subject, both of which reduce the influence of the white background on the camera’s exposure calculation. If the subject does not have any highlights that need to be protected, you can also add exposure and push the background tones to the right even further manually. If you do need to protect highlight ones in your subject, then the only option is to increase the relative brightness of the background (ie, boost strobe power or block light falling on the subject).
The end result should be the exact opposite of what’s desired in the cloud example: the tones of your subject can be just about anywhere in the histogram, but the background tones should all be clipped and show up at 255 on the far right.
[T]here are more specific lighting situations than I can even begin to consider in an article like this, but these are probably the three that I deal with most commonly. As I think of others, I may add them on to this article, and if there are any specifics that you’re curious about, please feel free to let me know, and with any luck, I’ll be able to add some insight.I hope that you’ve found this series useful!
Coming Next: Composition
