If you’ve read Part 1 and Part 2 of this series, you should have a firm understanding of what a histogram is and at least a basic understanding of how to read it. However, you still might be at a bit of a loss as to how you can use that information to improve your photography. In this article, I’ll discuss three of the most important adjustments that you should make based on your histogram.
The Perfect Histogram
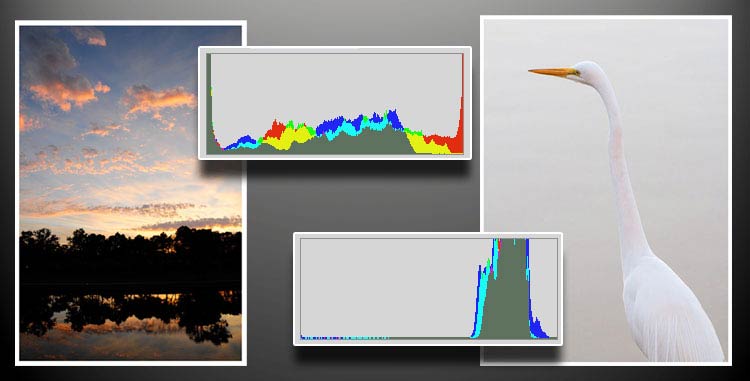
Many photographers want to know what the perfect histogram should look like, and the answer provided by most authors on the subject is usually this: There’s No Such Thing.
While this is technically true, it’s also somewhat misleading to the beginner. To be more helpful, we need to pair our first inquiry with another question, and first ask “What does the perfect photograph look like?” If you answer, “It should have as much highlight detail as possible while retaining as much shadow detail as possible”, then there are definite implications for your histogram. If your answer is “It should be pure white with no detail except in the subject”, then there are different implications. This second answer, incidentally, is very typical for product shots and portraits taken against a white backdrop. In most circumstances for the amateur, though, and in virtually all landscape photography, the goal is to maintain as much detail as possible, so I’ll proceed with that consideration in mind.
[During post processing, as a general rule, I like to have at least a little pure white in my image and a little pure black, so I adjust the curves or levels accordingly.]Potential Problem 1: Clipped Highlights

As we all know, the detail in digital photographs is formed by pixels of varying brightness and color. A group of pixels that all have the same RGB value would simply be a solid color or shade of grey, there would be no detail present within it. Detail can be created by varying the over-all brightness of adjacent pixels or varying brightness between color channels. Keep in mind that anytime the RGB values are equal to each other, the result is a shade of grey, and variation in any one channel from that creates a color cast. We also know that each channel has a range of values from 0-255 in an 8-bit scale.
Suppose that we’re taking a black and white photo of 3 adjacent blocks of grey, and with a correct exposure, Block 1’s value is 200, Block 2 is 220, and Block 3 is 250. What happens if we over expose the photo a little, and each value is raised by 5? Nothing very important. The whole scene is a little brighter than it should be, but it can easily be adjusted back down to the correct values in post processing with no loss of information (see the first two lines of the figure below).

Suppose that we over expose a bit more, though, and the values are all raised by 20 instead. Again, all of the values are brighter: 200 becomes 220, 220 becomes 240, but 250 becomes 255 because that’s the top of the scale; instead of going up to 270, this tone has now been clipped! How does this effect our image? Notice that in absolute terms, there is no loss of detail; there’s still a difference between the Block 2 and Block 3, but the relationship between the two has changed. When we shift the exposure down in post processing, and the values lose 20 levels each, there are only 15 levels separating the two blocks instead of 30; the contrast between the two has been lost.

The progression here is probably obvious at this point. Suppose that we over-expose more than that, and each value is raised by 35 tones. It should be obvious that Block 2 and Block 3 are now both going to be 255, while Block 1 is still not clipped, at 235. No matter how much adjusting is done after the fact, it will be impossible to recover the tonal difference (and thus, detail) between Blocks 2 and 3; the relationship has been completely lost, and needless to say, further overexposure would also obliterate the relationship separating Blocks 1 and 2.

In our example with grey tones, we were looking at three very distinct shades of grey (two of which were pretty dark) and it took quite a bit of over-exposure to lose detail. In the real world, though, the highlights of a photo can be rich with subtle textures and tonal grades. The differences between the real-world Block2 and Block3 are likely to be only one or two levels. Consequently, any instance in which you have data actually pushed up against the 255 mark of your histogram is likely to represent some loss in detail that is impossible to recover. If you’re shooting in color (and we all should be, shooting RAW) then it’s also important to recognize that when all three channels clip (255,255,255 RGB), the color is also lost… if all of the channel numbers are equal, the tone is neutral… so no matter how much you lower the exposure later, you’ll still just get grey. Similarly, if only one or two of the RGB channels is clipped, the relationship between them is effected, causing a color shift.
General Rule #1 : Keep the brightest tones in your image below the white point (255) on your histogram if you don’t want to lose detail.
 In some cases, it is expected and acceptable to have some clipping: if the sun is in your photo, or light bulbs, or shiny highlights in chrome, for example. Capturing detail in these areas would mean gross under exposure of the rest of the photo. These are also things that we perceive without detail in our daily lives, so it can actually be disconcerting if they have too much detail in a photo.
As mentioned previously, there are also specific circumstances in which you’ll prefer to lose highlight detail. About a year ago, for example, I shot the catalog photos for a tea shop in Snohomish, WA. The teas were to be photographed on pure white, to blend in with the pure white of the website background. Because of production time constraints, several hundred loose teas were set out for me on sheets of white paper. While photographing them, I over-exposed so that any textural detail in the paper would be lost, and in post processing, I corrected the exposure for the teas (a simple, batch command, since they were all equally over-exposed). On the other hand, if you’re shooting a bridal portrait, it is not acceptable to blow out the highlight detail in the gown for which the bride just payed thousands of dollars.

When You’re Shooting: Most digital cameras these days can be set so that they display the histogram after the shot, which is very helpful. You can quickly check the histogram and make sure that there’s a little space between your data and the right side of your histogram, and keep shooting. Another option is to have the camera display areas where highlights are clipped on the photo – they usually blink – which also gives you an indication of where the problem is. If there’s too much blinking, adjust your exposure compensation down 1/2 stop (or adjust your exposure any other way you choose) and re-shoot.
Keep in mind that sometimes only one of the RGB channels will clip, but the area will still blink. If this is the case, you might still have some highlight detail in the non-clipped channels, so the exposure might actually be acceptable. The same is true if your display shows a combined histogram instead of separate color channels, so if you want the most information to base your exposure on, set your camera to display histogram info for all three colors.
Potential Problem 2: Under-Exposure
An analogous problem exists at the left side of the histogram, and it’s complicated by additional factors that will be discussed below. Shadow detail tends to fall off a little more gently than highlights clip, but getting good shadow detail can still be a very difficult task in digital photography.
When You’re Shooting: If you glance at your histogram and notice that a lot of pixels are piled up at 0, you should consider sliding your exposure compensation to the positive side. Depending on your photographic goals, it may even be worth blowing out highlights… especially if your subject is in the shadows.
Potential Problem 3: Expose To The Right
“Expose to the right” has become something of a mantra for many landscape photographers after the publication of the the article on the subject by Michael Reichman around 2003. As with anything on the internet, there is some debate regarding this technique, and I recommend using it in moderation rather than as an absolute rule.
This principle is based on the fact that (1) our camera sensors capture data in a (roughly) linear fashion and (2) our sensors always create a certain amount of extra, random data (ie, digital noise).
Most DLSR sensors capture 14-bit images (16,384 levels) these days, and have a dynamic range of about 10 f-stops. If the capture of these tonal levels were evenly distributed across all ten f-stops, then we’d see that each stop would be recording about 1638 levels, and although exposing to the right would still be important (not getting any tones in the brightest stop on the histogram would mean a loss of 10% of your available levels), it would be a negligible difference in most cases.
But that’s now how our sensors work. Instead, the first f-stop contains a full HALF of the available levels (8192), the next stop contains half of that (4096), the next stop half again (2048), etc. This means that the brightest 3 stops of your exposure contains about 88% of all of the possible levels of tonal distinction. The darkest 3 stops combined, on the other hand, contain only 128 levels ( 0.7%).

These numbers are approximate, of course: not all sensors are the same- some are not exactly linear in their capture, and some have more dynamic range than others- but the general idea is valid: your camera is capable of capturing more information in the brighter portions of an image than the dark. Furthermore, if the sensor is generating 10 levels worth of noise, that noise is a significant portion of the image forming data in the lower three stops, but it’s negligible in the upper three. Put another way, the signal to noise ratio in the dark tones is quite bad (128:10), but quite good in the bright tones (14226:10). This is why digital noise is always most problematic in shadows, of course.
When You’re Shooting: To get the best signal to noise ratio and make use of the most tonal levels, you should over-expose your image until your highlights are as far right as possible on the histogram without clipping any channel. Your photo will not look good coming out of the camera, but when the exposure is corrected in post processing, you’ll have less noise and more detail to work with. I don’t recommend this for jpg shooters (but I also don’t recommend shooting jpg).

If you’re still getting comfortable with exposure compensation and would like like a fail-safe, or if you’d like to have more options, auto-exposure bracketing can also be used to provide one or more additional exposures with more (or less) exposure. Consult your manual.
Histograms display an incredible amount of information, so the more that you get familiar with them and how they should look to match what you’re trying to capture, the better your images will be. One of the advantages of using your histogram in the field is that you can get an accurate representation of your exposure even if it’s too bright for your LCD to be worth looking at otherwise. The same idea holds true to some degree for post processing as well; even if you’re using a monitor that is too bright, you can tell whether your image really has blown highlights by checking out the histogram.
Since Part Three has run a bit longer than I’d anticipated, I’m going to pick up this thread for a few final examples in : PART FOUR, Situational Specifics
