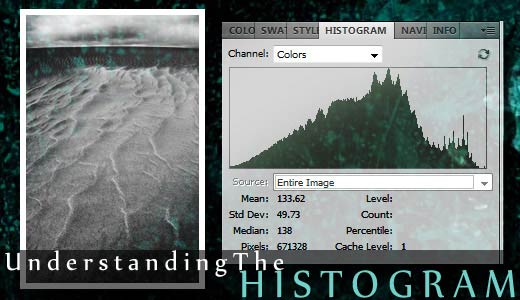
An Explanation of the Histogram : Histogram Basics
Histograms are almost always confusing for the beginner in digital photography, which is unfortunate, since they are so incredibly important. Being able to read a histogram in digital photography is like being able to read (and understand) a black and white negative in traditional photography: it tells you whether you’ve exposed correctly, the tonal distribution of your image, and the amount of contrast. It also tells you how much work you’ll have to do to get a good looking print from the file, or whether it will be possible to get better detail by processing the image at all. You’ll use histograms when you’re shooting photos, and when you’re processing them. So, lets take a quick look at how to read and understand a histogram.
Before I go on, though, let me say this: If you take a look at this article and are intimidated by the collection of diagrams and figures: DON’T PANIC. If you simply make sure that you understand each one before you move on to the next, they’re a piece of cake.
What is a Histogram?
A histogram is nothing more than a bar graph. The X-axis (across the bottom) represents the tonal scale from black (all the way to the left) to white (at the right). The Y-axis represents how many pixels in the image are in that particular area of the tonal scale.

Lets begin with an example. Take a look at figure 1. This figure represents an image that is 4 pixels wide by 4 pixels tall. It’s a black and white image, and for the sake of simplicity, I’ve reduced the tonal palette to only 16 shades of grey, including pure black and pure white). The scale works like this: black is 0, white is 15, and a gradation of 14 shades of grey connect them, with medium grey in the middle (only 11 of these shades are used in the image).
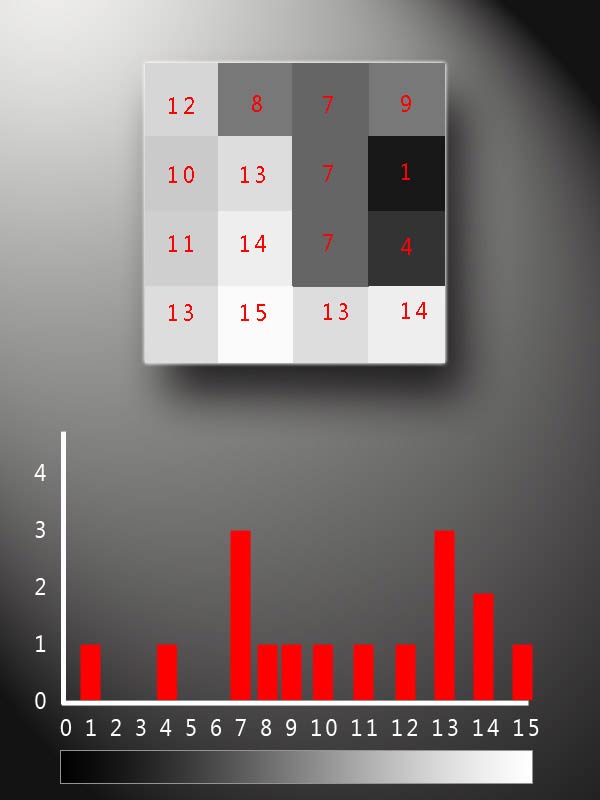
The histogram for this image can be seen in figure 2. As you can see, the horizontal scale starts with 0 at the left and ends with 15 at the right, and the count along the Y-axis is simply the number of pixels in the image that are that particular shade of grey. In this image, there are no pixels that are pure black, so there is no bar at 0. There is, however, one pixels that is almost black, which is tone 1. Since there is one pixel at tone one, the bar reaches 1 on the Y-axis. However, there are three pixels that are tone 7 (I’ve labeled them on the diagram at the top of figure 2), so the bar at 7 across the bottom reaches all the way up to 3 on the Y-axis, and of course, the same is true of tone 13.
If all 16 pixels in figure 1 had been the same shade of grey (5, for example), then the bar at 5 would reach all the way up to 16, and there would be no other bars on the histogram. In this case, none of the bars extends beyond 3, so I stopped counting at 4 on the Y-axis.
Now, to get a little closer to reality…

So far, we’ve been looking at a 4-bit color space, which means that there are 16 tones, starting with black and ending with white. A 5-bit color space would have 32 shades, 6-bit would have 64, 7-bit would have 128, and 8-bit would have 256 shades, again including black at 0 and white at 255.
All of the histograms that you see in Photoshop or on your camera are 8-bit, even if you’re shooting 14-bit RAW files or working in a 16-bit space in Photoshop, so the 8-bit histogram is the most important to get familiar with.
Take a look at figure 3. This image is 8 x 8 pixels, but still only contains 16 shades of grey. However, none of the 16 shades of grey is true black or white, so these shades do not fit into a 4-bit space (which only has 14 shades of grey between the black and the white). The shades of grey in this image are actually from an 8-bit space, and I just discarded all of the others.
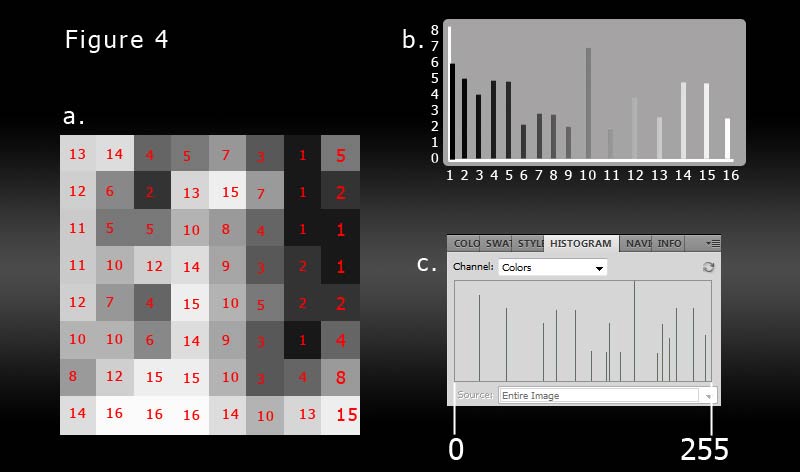
In figure 4a, I’ve labeled where the 16 tones fall in the image, and in 4b, they’re plotted on a simple bar graph. 4c shows those same tones fitted into their proper places in an 8-bit space. The darkest tone in the image is actually shade #24 (very dark grey), so it is represented by the first bar in the histogram from the left (about 10% of the way across), NOT at 0 because 0 is true black. The brightest tone in the image is at 250, which is actually quite close to pure white, and it’s bar can be seen just to the left of the 255 marker. (On the 8-bit scale, the tones in the example image are 24, 51, 88, 101, 120, 136, 151, 154, 165, 179, 202, 207, 214, 221, 238, and 250.)
The only real difference between the bar graph (4b) and the histogram (4c) is that the histogram leaves an empty place-holder for every single shade of grey in the 8-bit spectrum across the x-axis. As a result, when you see a bar of pixels at any particular place on the histogram, you know that they always represent the same shade of grey.
You can tell just by looking at the histogram (4c) that the tones in the image are mostly light: all but 5 of the 16 bars are to the right of the center of the histogram (medium grey) and they’re taller, on average. Most of the tones in the photo, then are brighter than medium grey.
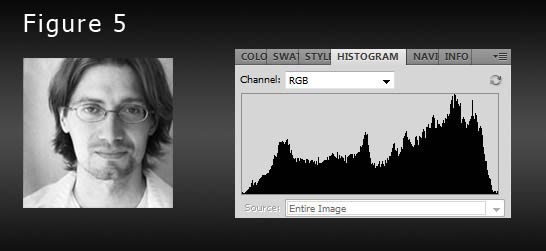
Finally, take a look at Figure 5. This is the same image, but at higher resolution (150×150… yes, it’s just my avatar from this site), and not restricted to 16 shades of grey. You’ll notice that the histogram is somewhat similar in shape to the previous one, but with bars for the rest of the shades of grey filled in. In this image, there are true blacks and whites, so the histogram does extend all the way from the left to the right, though there are very few pixels in those areas, so the bars at the ends of the histogram are not very tall.
Questions? Feel free to ask them below!
