
Noise Reduction software is now an integral part of the photographic workflow, just as much as yellow and magenta filters were in the days of the wet B&W darkroom. They are particularly important, though, for those of us working in photojournalism, wedding photography, and similar fields that require us to shoot indoors in poorly lit venues at high ISOs. Even images from the best modern sensors benefit from proper noise reduction (NR) treatment.
One of Photoshop CS4’s few shortcomings, though, is its weak noise reduction functionality. To get the best results, it is now necessary to use 3rd party software, either stand alone or as a Photoshop plug-in. Over the years, dozens of different NR programs have been released, but today, only a handful of them are really worthy of attention, either because of their popularity or effectiveness.

One wonderful site, MichaelAlmond.com, has already compared many of these programs, especially many of the older Photoshop actions, and I would not hesitate to recommend reading his information. I found, though, that his reviews were missing some key information and were, at the same time, not organized for quick reference. They’re also getting to be a little out of date (last updated in 2005). Consequently, I’ve decided to write some updated and augmented reviews of my own. I hope that you find them useful.
After speaking with other professionals, looking at magazines, forums, and websites, and of course, trying programs myself, I’ve narrowed the list of NR programs down to several that deserve mention. That said, I expect to be adding reviews and comparisons of new programs as time permits.
| NR Program | Picture Code Noise Ninja | Imagenomic Noiseware | Nik Software Dfine | Neat Image |
|---|---|---|---|---|
| Official Site | picturecode.com | |||
| Version Tested | 2.32b Professional, 64-bit | 6.2 Professional | 2.0 | 6.1 Professional 64-bit |
| Retail Price | $79.95 (Pro Bundle) | $69.95 | $99.95 ($79.95 at B&H) | $79.90 |
| Format | Photoshop plugin (tested), Stand Alone | Photoshop Plugin (tested), Stand Alone | Photoshop/ Compatible Plugin | Photoshop, Stand Alone (tested) |
| Operating Systems | Windows 32/64-bitMac OSX 10.2 or later | Windows 32/64-bitMac OSX 10.4x/10.5x or later | Windows 32/64-bit (XP SP3 or later)Mac OSX 10.4/10.5 or later | Windows 32/64Mac OSX |
| Photoshop 64-bit | Yes | Yes (Pro Only) | No | Yes |
| Compatibility | Elements, Aperture | Elements 4+ | Lightroom 2.3+, Elements 2.0+ | Elements |
| Color Mode | RGB, CMYK single channel | RGB, LAB, CMYK single channel | RGB, LAB, CMYK | RGB, single channel LAB & CMYK |
| Bit Depth | 8/16bit | 8/16bit | 8/16-bit | 8/16/24/48-bit |
| Camera Profile/ Custom Profile | Both | No device profiles, Auto and Manual | Both | Both |
| Smart Filter | Yes | Yes | Yes | |
| Selective Sharpening | Yes | No | Yes | |
| Batch Processing | Yes | Yes | Yes | Yes |
Like any other technical procedure, noise reduction has its own jargon. Feel free to skip this section if you’re familiar with the terminology, or refer back as it becomes necessary.
Digital Noise : In digital photography, Digital Noise is the equivalent of “grain” in film-based photography. Any pattern, texture, or coloration introduced into the captured image that is caused by the sensor (or related processing) rather than the subject can be considered Digital Noise. It can also be introduced into an image by a scanner. Most noise occurs when heat or extra electric charge in the sensor causes receptors to fire when they should not. Using a high ISO setting on a digital camera allows extra power to the sensor to increase its sensitivity, but also increases the amount of heat, and consequently, the number of misfires in receptors.
Chroma Noise: Chroma Noise (also called color noise, chromatic noise, etc) is exactly that; it is colored pixels introduced into an image that cause color shifts and loss of saturation. Usually seen in deep shadows.
Luminance Noise: Luminance Noise is the most common type of digital noise and is characterized by grainy patterning caused by different luminance levels (ie, dark and light) in an area that should have had relatively even luminance levels from pixel to pixel.
Each noise reduction program will be submitted to a series of tests TWICE. The first time through, the photos will be processed with the software’s default settings. Although this may appear to be giving some of the less user-friendly software a handicap for the sake of laziness, the fact is that many some of us rely on assistants to process our images who, we fear, are just too daft to be able to use the software to its fullest extent, and we need to know what the software can do by itself. Alternately, there are instances when we use the software to batch process hundreds or thousands of images, in which cases using the default settings are the only practical option. This will also provide a solid basis for further comparisons.
The second time through, the software will be optimized as much as is practical. Custom profiles will be loaded where applicable, and I’ll spend perhaps as much as 10 minutes adjusting the sliders to get the best results. If the program were to require more than that amount of time to be properly optimized, I would consider it a drawback in any case.
In order to test the software thoroughly, I’ll use each program to process several photos. One will contain many smooth, middle to dark tones but minimal color. Another will contain brighter colors, but still mostly smooth tonal gradations. A third photo will contain a considerable amount of mid-level detail throughout, and a fourth will contain more fine detail. All of these images will come from an Nikon D80, which I find to be excessively noisy probably due to its CCD sensor (rather than the more recent CMOS sensors). I’ll finally test the programs on scanned film, both black and white negative and color negative.
The details of each test will be compiled for each program separately and then combined for comparison at the end of the article.
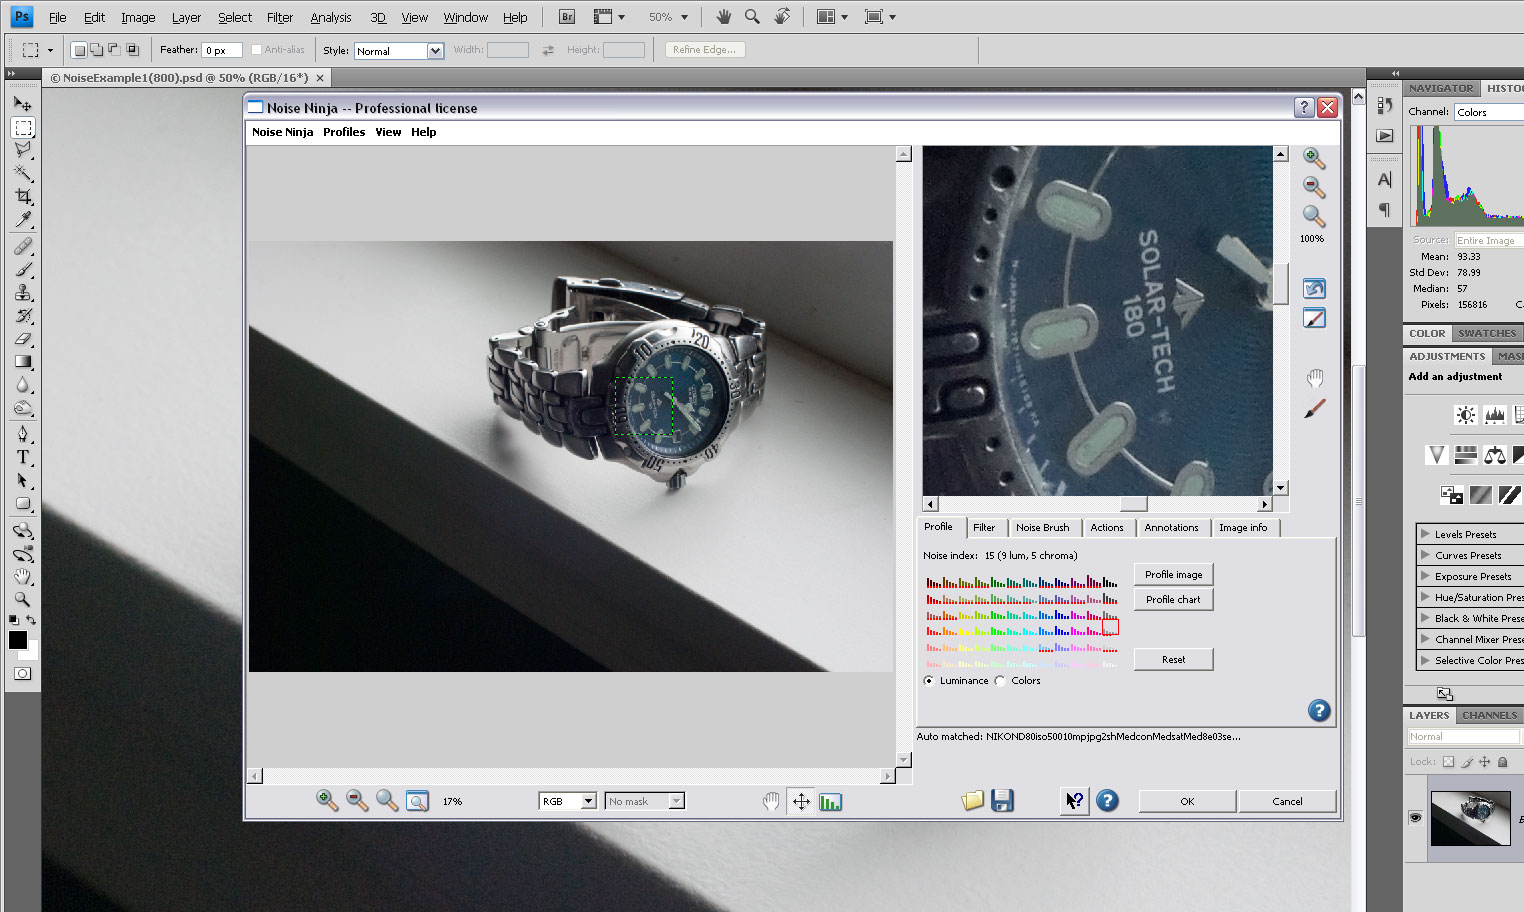
Noise Ninja, aside from having the coolest name of all the programs tested, has been around for a long time and has a good reputation. It’s a snap to install: just click on the installer and keep pressing “OK” until it’s finished… it automatically detects your Photoshop plugins folder.
Documentation
Noise Ninja comes with two extremely helpful documents: the 30 Second Guide and the 5 Minute Guide, both available from the plugin’s help menu (and in the program folder).
The Interface
The layout of the plugin is similar to what we’ve come to expect from many Photoshop filters; there’s a large window to the left that for navigation and to preview the overall effect (but can be zoomed in or out), and a smaller window at the top-right zoomed to 100% (or greater) for viewing pixel detail. Yellow dashed boxes in the left window indicate which areas of the image are being used to generate the noise profile. The image to the right can be dragged to change the area that is magnified, or the scroll bars can be used. The interface in general is not extraordinary; it simple and does its job, but is not exactly attractive or innovative.
Operation: Automatic
In automatic mode, Noise Ninja works with mindless ease. If no camera profiles have been configured, the program creates a profile as the plugin opens. Sometimes this works better than others, but in my experience, it has always been better than doing nothing. Noise Ninja seems to be more conservative than other programs in this regard, erring on the side of leaving too much noise rather than removing detail. If you’re in a hurry, you can simply press OK, and be done with it.
In fact, the plugin is not intended to be fully automatic. Once the image has been automatically profiled and the default settings have been applied, the best results can be achieved by clicking on the “Filter” tab and adjusting the Strength and Smoothness sliders.
Operation: Manual
To get the most out of Noise Ninja, you’ll need to begin by loading a set of profiles for your imaging device (camera, scanner, etc). The program includes an image file that displays a pattern of different colored boxes. This document is intended to be printed and then photographed at a variety of ISO settings. The resulting photos are then analyzed and the settings saved as profile settings which, as a group, comprise a custom camera profile.
Alternately, you can download a profile for your camera from the Noise Ninja website. My results with pre-made profiles have been mediocre, at best, unfortunately. For some reason, the plugin tends to load the ISO 500 profile settings for my ISO 800 files, which produces an odd, blotchy pattern which is much worse than using auto-profiling. This may be an anomaly with the D80, however.
Once the profile has been loaded, it will automatically be used any time the plug-in is called upon to process a picture from a corresponding camera, so this can be considered a one time (or few time, if you have a few cameras) procedure rather than part of a manual workflow. With the profile loaded, you can proceed to make any necessary adjustments to the Strength and Smoothness sliders, but adjustments beyond that are rarely necessary.
Despite their overall excellence when it comes to documentation, the folks at Picture Code seem to have overlooked mention of the Colors sliders. There are three of them, and by default, they are set to 10. They do mention that these sliders control chroma noise, but that doesn’t provide much more information that we’d all have guessed. It does not mention, for example, which slider represents which color. My assumption, on the rare occasion that I’ve made adjustments to these sliders, is that they’re arranged R-G-B from top to bottom, which makes some initial sense to me. It makes somewhat less sense, however, when we take into account that Noise Ninja doesn’t work in an RGB color space. Instead, it converts the image to YCrCb (Luminance, Chroma-red/green, and Chroma blue-yellow), which is similar to LAB color space. Or could these be the “Strength, Smoothness and Saturation” sliders that Mr. Almond mentions in his review? Whatever the case may be, adjustments with these sliders are not usually necessary… in fact, in my version there is no appreciable difference in the preview window between having all three set to zero or set to 10.
Unique Features
Noise Ninja’s Noise Brush allows selective sharpening from within the plugin dialog box, and it’s more useful than you might think at first. As a general rule when I use noise reduction, I duplicate the layer being affected and then use a layer mask on the NRed layer to select areas that I don’t want affected. The Noise Brush is even better, though, because it allows you to electively mask just the luminance or chroma noise (or both, of course… which ends up being functionally the same as using a layer mask). I’ve often found that in dark wedding photos, I end up masking the NR on dark eye sockets that are short on detail, and in doing so, the sockets are often speckled with stray color. Not so if you use the Noise Brush… you can save the detail by masking the the luminance NR but remove the speckled colors by allowing the chroma NR.
Summary Comments
Noise Ninja has good documentation and is quick and easy to use. Its default settings seem to be more conservative than other programs, but manual adjustments are easy. The Noise Brush is a very helpful addition.
Noiseware is also one of the most well respected NR programs, having been recommended by sites such as michaelalmond.com and stuckincustoms.com, among many others . Again, it is a simple matter to install: just execute the file and click OK when prompted.
Documentation
Noiseware is bundled with a slick 36 page pdf user’s manual, but unfortunately has no help or manual access from within the program itself. The manual is broken into two sections, one for basic use (which basically instructs us to “Click OK”) and one for advanced use, which covers fine tuning and adjustments in a good deal of depth.
The Interface
Noiseware’s interface is similar to but a bit more complex than that of Noise Ninja. There are two image panes, but in Noiseware’s case, the larger of the two is the preview pane, and the smaller is simply used for navigation help. When the entire window is re-sized, the preview pane is also re-sized, making it possible to significantly enlarge the preview area, which I find to be an advantage over Noise Ninja. Like Nik’s Dfine, the preview pane can also be viewed in split screen mode or side by side mode, with one half the “before” view and the other the “after” view.
Operation: Automatic
If used fully automatically, Noiseware is even simpler than Noise Ninja, in that the instructions do not even suggest that you should make manual adjustments to taste before pressing OK. Used in the manner, I find that NW is a little heavy handed on fine detail, although thoroughly sufficient on noise. I might use defaults for processing wedding proofs, but I would not use it for any sort of final product.
There is a little bit more to NW’s automatic operation, though. In addition to the default settings, there are also several pre-sets which can be chosen from a drop-down menu above the main controls to the left of the window. If your image fits into one of the categories listed, selecting it may provide better results.
That said, one of the interesting features of Noiseware’s NR engine is that it claims to learn from processing images, so the more images that are processed from a camera at similar ISO settings, the better the program should get at de-noising them. I haven’t used the program sufficiently long to know how well this works, but the concept is intriguing.
Operation: Manual
Unlike some of the other NR programs, Noiseware doesn’t provide the option to load a pre-made or custom made camera/device profile. Instead, as I mentioned, it uses a “learning” algorithm that develops better automatic profiles as more images are processed. Given this fact, it seems like a good idea to spend some time training the program by processing typical photos from your camera or scanner, though the documentation doesn’t provide any guidelines for doing so.
Beyond the auto-profile, though, NW has 10 groups of sliders for fine tuning the noise reduction. It seems that if you want to get the most out of this program, you’ll really need to spend some time figuring out all of the different controls, though most of them can be left alone. For those of us that are perfectly happy to study the technical details, this is just fine… I enjoy having as much control as possible. For those who prefer a simpler, more efficient approach, this program may seem a bit daunting.
Unique Features
NW doesn’t have much in the way of new gimmicks beyond their “learning” profile engine, but they do have one feature (among a few other minor ones) that I think is worth mentioning, and that is Bracketing! Similar to exposure bracketing on your SLR, but with different levels of noise reduction. Theoretically, you could process and image three ways and then blend them with masks in Photoshop to get the best of all worlds, assuming that such a thing isn’t possible without doing so. Seems like a solid backup plan.
Summary Comments
A program with some great ideas and implementation, but also a bit more complex than some people will like. Its defaults are a bit too aggressive on fine detail for my tastes, but they do a great job on nearly everything else. I should mention here that I was shocked at how perfectly the noise was removed from highly detailed areas when I took the time to adjust the settings manually, although doing so did allow some noise to remain in areas that should have been smooth tones.
Nik Software has produced a very popular, well known suite of Photoshop plugins which we all see advertised in our favorite imaging magazines (along with Alienskin, onOne… etc). Installation is simple, although on my x64 system, I was annoyed that I could only install this plugin for the 32-bit version of Photoshop. Naja… so ist das Leben.
Documentation
The literature for Dfine is substantial, including a 47 page pdf guide and a healthy help menu accessible from within the plugin. I’d like to see a concise workflow guide, and the information reads like a stereo manual, but there is plenty of information there for anyone willing to use it.
The Interface
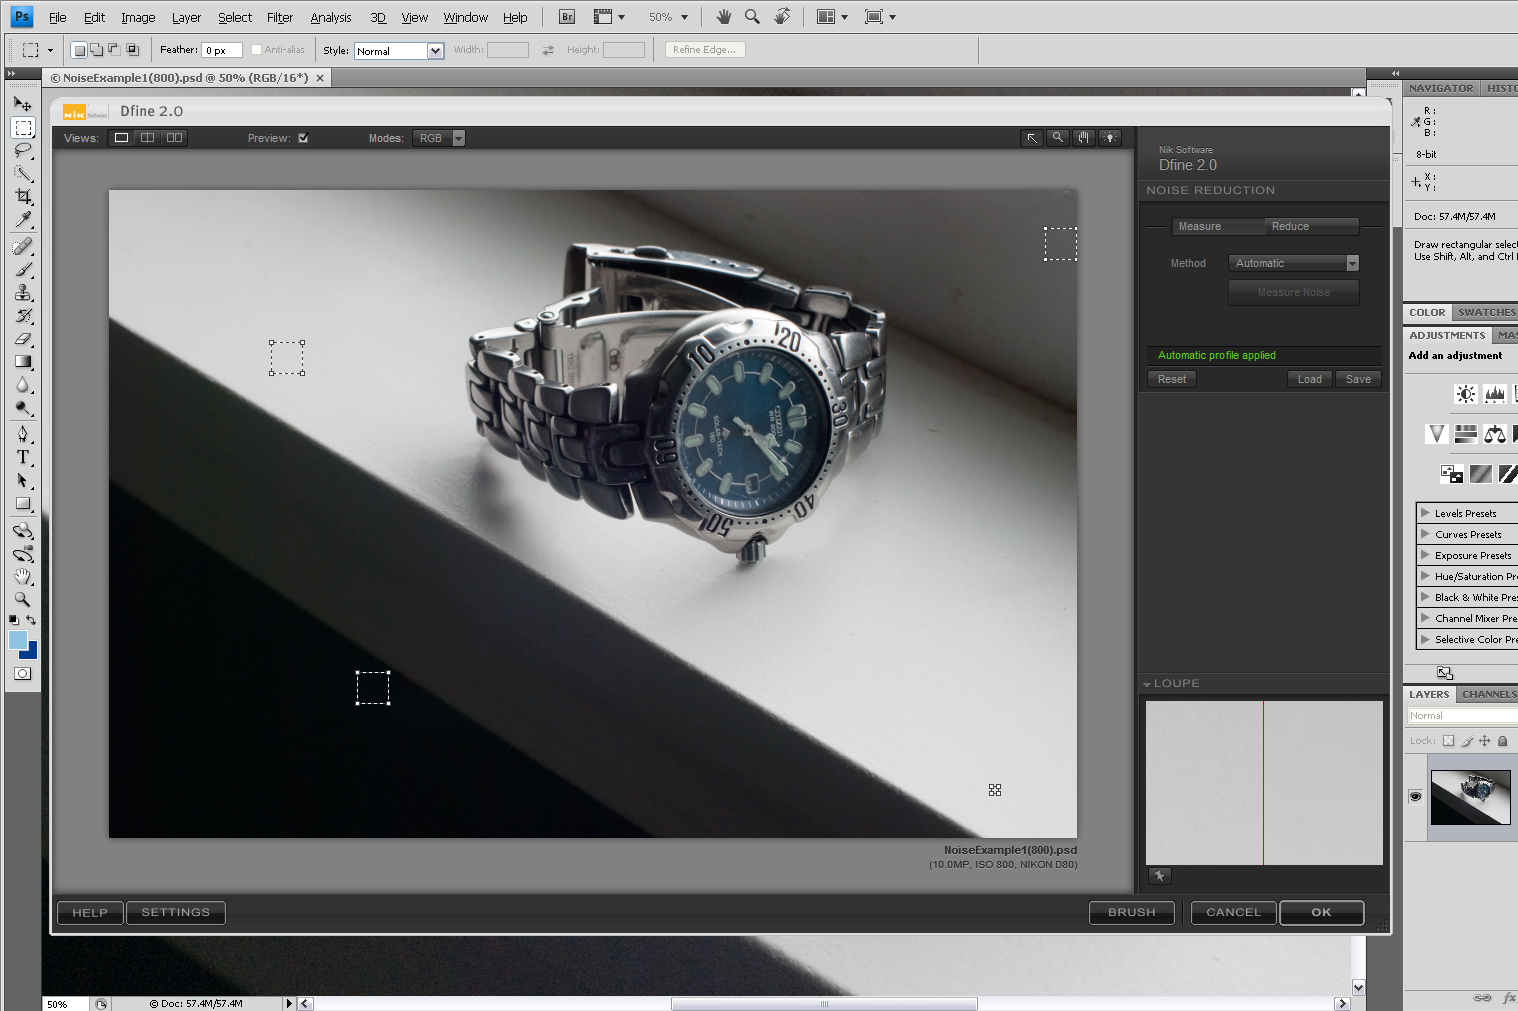
As you might expect from such a popular software maker, the interface looks very slick… more like it was crafted with Flash than with a traditional programming language like C++. It’s safe to say that from an aesthetic perspective, this is the nicest looking Noise Reduction plugin that I’ve seen.
Functionally, the interface is unlike the others as well. The default view is pretty annoying, with the only comparative view to be found in half of the small window in the bottom right corner. There are, however, two others: a split view in the main window and a side by side view. Both of them have their strengths, and although I still prefer the ability to click on the image to see the before/after views, I can see how some might be attracted to these options.
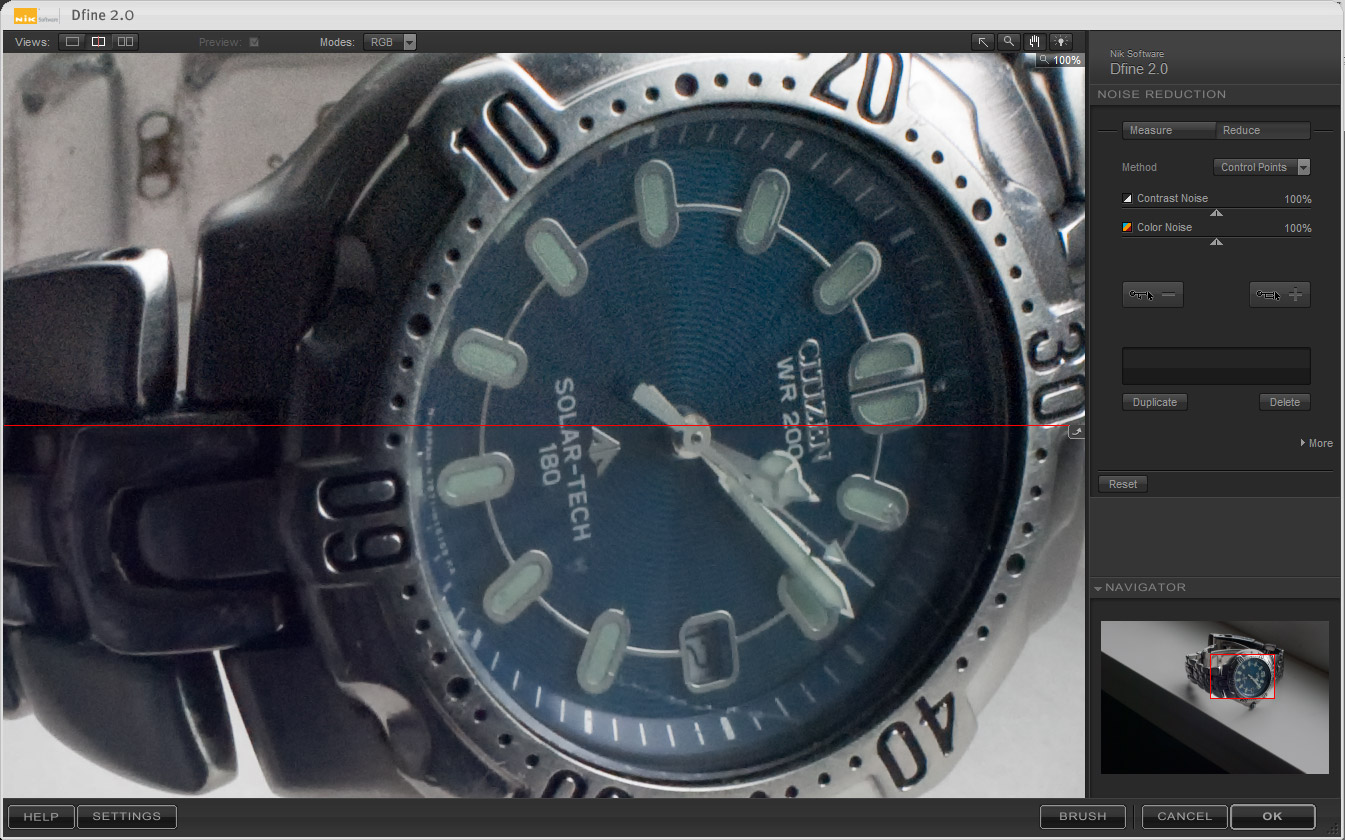
If Noiseware was a bit complicated with 10 sets of sliders, Dfine is a bit simplistic, with only 1 set of adjustment sliders, plus some selection controls. Clicking on the “Reduce” tab reveals it, one slider for luminance noise (called contrast noise) and the other for chroma noise (called color noise).
Operation : Automatic
This plugin screams to be used in full automatic mode. In fact, the only manual controls (other than loading manual profiles) are hidden by default. That said, I was not favorably impressed with the operation of the plugin in with an automatic profile; it left some noise in areas that should have been smooth while blurring more fine detail than I’d have hoped.
Operation : Manual
Manual operation is actually not much different. A camera profile can be loaded, and the two sliders can be adjusted. Further selections can be made on the image to help refine the profile as well. Otherwise, this is a quick, simple plugin.
Unique Features
One of the points of interest with Dfine is how it handles layers. Unlike all of the other plugins that I’ve tried, Dfine begins by creating a new layer and applying the noise reduction only to the new layer, so that all operations are essentially non-destructive, which is a great idea. This procedure also allows Dfine to utilize a “Noise Brush” tool of its own. Essentially, if you click on the Brush button in the main plugin window, the plugin applies the noise reduction to the new layer, creates a black layer mask over that image, and provides you with a white paint brush to “brush in” the noise reduction. Again, this saves some steps, but because the selective NR is taking place outside of the Dfine environment, you do not get a choice of brushing in (or away) chroma or color noise separately, as is possible with Noise Ninja.
It is also worth mentioning that, because of the way that Dfine handles images as separate layers, Dfine is the only program in this group that can de-noise a CMYK image (rather than a single channel). Since most people will want to only de-noise the K channel in a CMYK file anyway, this may not be a major concern, but its nice to know that the capability is there, especially for images with heavy chroma noise.
In addition to getting great reviews from Almond, this program has also received praise from photographers such as Michael Reichmann on the Luminous Landscape, which my readers will recognize as one of my favorite blogs. As with the other plugins, installation is simple as long as you have the correct version (ie, version 6.1 for 64-bit systems and 6.0 for 32-bit systems).
Documentation
Neat Image doesn’t seem to come with a pdf manual as some of the others do, but it does have a very helpful helpfile that can be accessed from the plugin window during use (it also has a small install-help file). The documentation is well organized and concisely written, and opens to a section called “Using the Plugin to Process Images”, which is a nice little guide. There’s also a link to the Quick Start Guide on the Neat Image website from the help menu.
The Interface
I like Neat Image, so I wish that I could say better things about the interface. It’s not terrible, it just seems a little inefficient and un-intuitive to have the entire thing split into two tabs when other programs manage with one. The layout confirms Neat Image’s strong focus on device profiles, with the initial tab (Device Noise Profile) dedicated solely to loading (or Auto-generating) them. The second tab, Noise Filter Settings, contains exactly what the label suggests, and on the plus side, it contains all of the available adjustment sliders, even in the “Advanced Mode”, which is reachable via the Tools menu. I’m not crazy about all of the colors used in the interface… green text in the main tabs, blue in the adjustment tabs, and red and blue colored icons. In a color controlled environment, I’d rather use something monochrome… but these colors wouldn’t be a deal breaker for me.
My main gripe with Neat Image’s interface is it’s preview functionality. In plugin window, there is only one image pane, and the preview of the applied effect is restricted to a small (roughly 300×300 pixel) square. At 100%, this isn’t so bad… just a bit small. At 25%, though, assuming that you’re viewing an image that is at least 10 megapixels, a 300×300 pixel area is pretty useless in getting an idea of how plugin will effect the image in general, or even the area inside the preview square. This could use some work.
Operation: Automatic
To use this plugin properly, you’d begin by downloading a device profile from the Neat Image website for your camera or scanner.
Skipping that step, though, you can begin by simply opening the plugin, clicking “Auto Profile”, then moving over to the Filter Settings tab. Here, the sliders will be set to defaults and can be used as such, but some tweaking may be advisable. Then, you click the “Apply” button (which has a skip-track icon on it?), and you’re finished.
Auto profiled, my initial test images seemed to lose a significant amount of fine detail, and the smooth areas were about as noisy as those produced by Dfine by default. Again, if detail is going to be lost, I’d like to see the rest of the image nicely smoothed, at least.
Operation: Manual
Operation of this plugin should begin with downloading or creating a good set of profiles for your equipment.
Once that is done, I also advise switching to the Advanced Mode (under the Tools menu), which brings up a nice collection of 15 or so sliders which allow you to fine tune the noise reduction in thorough but simple way. The only real hindrance here is being able to see the relevant parts of the image as you make the adjustments.
Concluding Comments
So far, I’ve been favorably impressed with Neat Image, though I’d like to see improvements made in the interface.
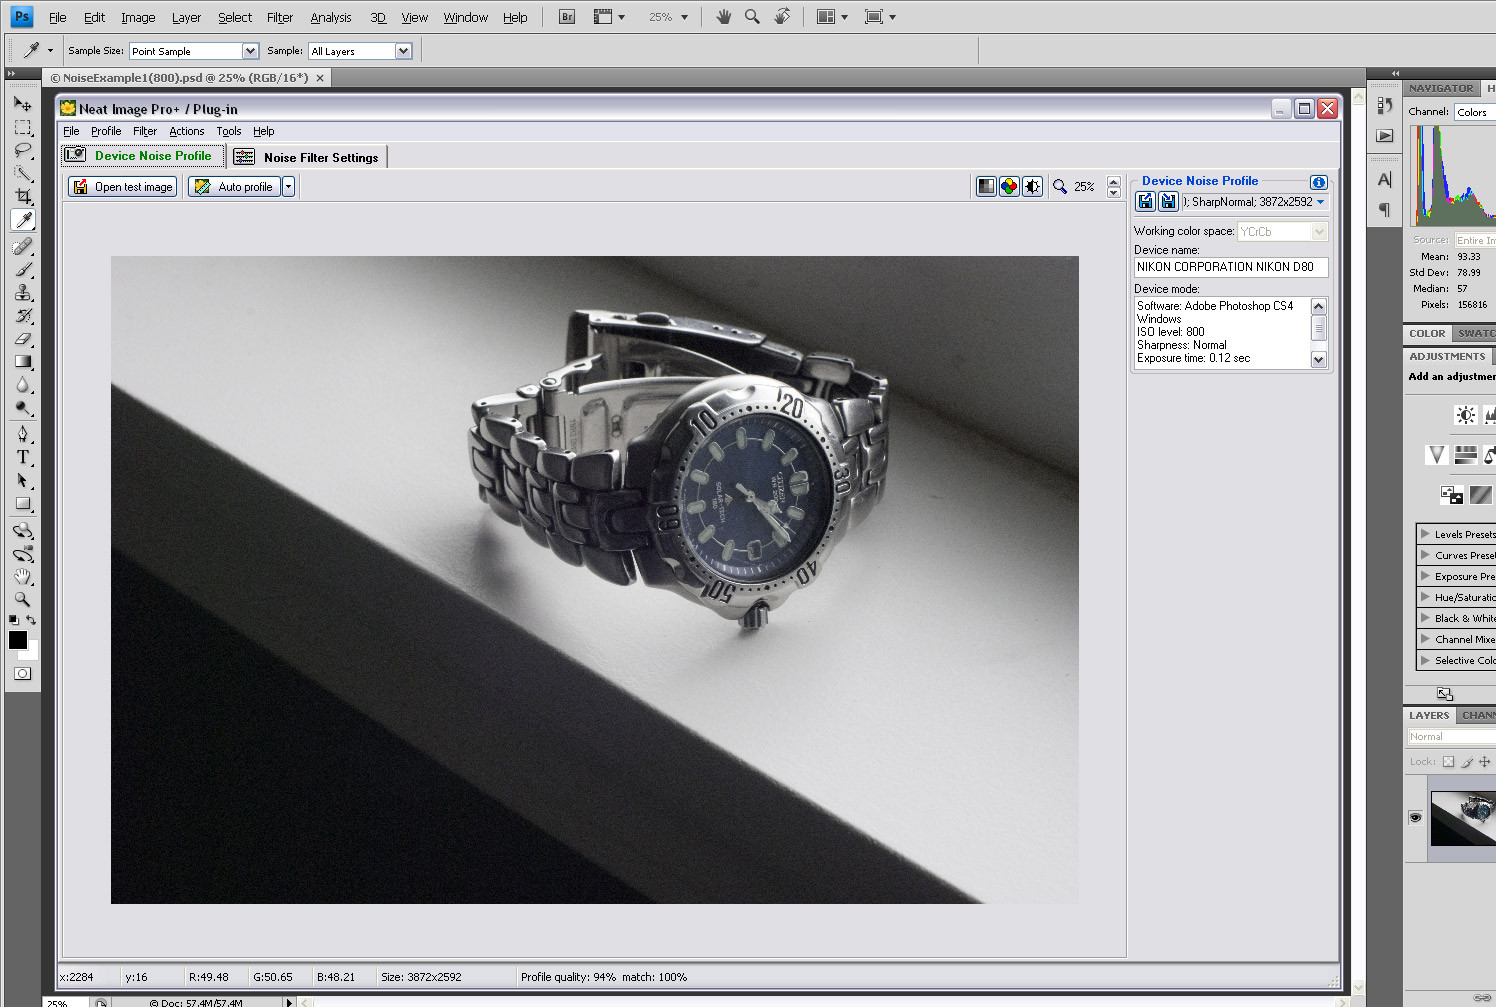
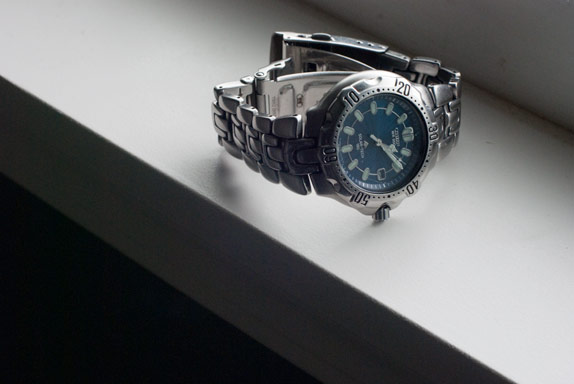
This photo was taken on on a cloudy-day window sill here in the Seattle area. The Nikon D80 with a Nikkor 50mm f1.4 lens was tripod mounted (cable release used), and the exposure was 1/8th of a second at f11, at ISO 800. Anything beyond 800 with this camera is insanity.
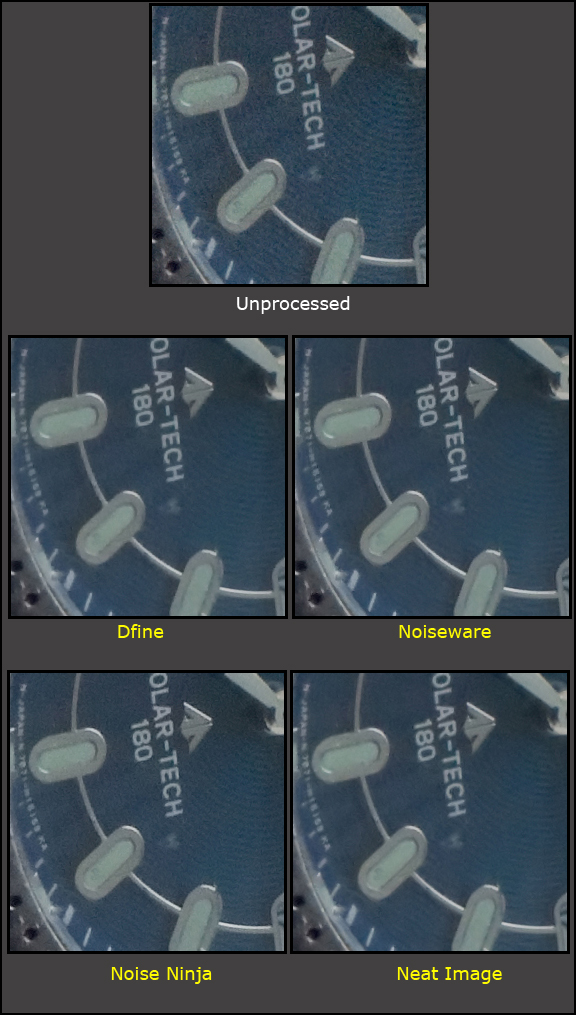
The idea here was to use an image that was mostly monochrome, so that any chroma noise would be more prominent. Also important in this image are the large areas of smooth textures and the tonal gradients that usually require different levels of noise treatment in the dark and light ends. I was a little surprised to find that the chroma noise was relatively minimal in this image, but there is plenty of luminance noise.
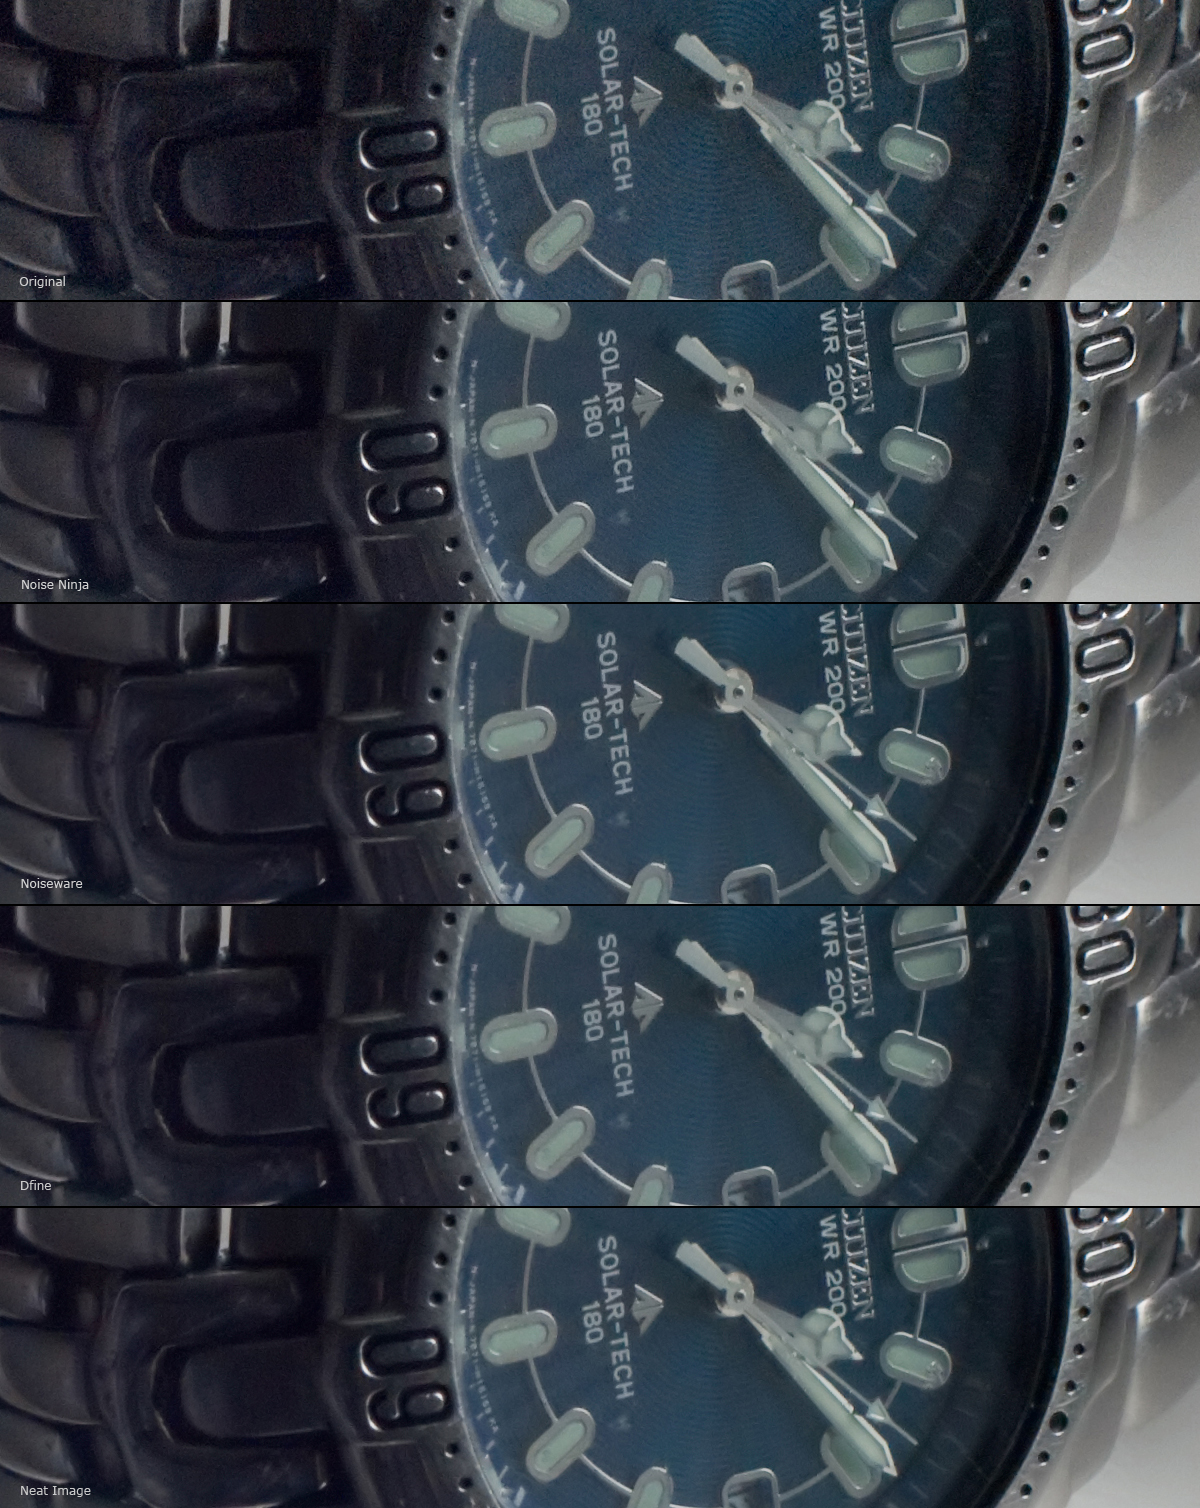
The following image is a comparison of mainly detail noise. Click on the image to get the full resolution.
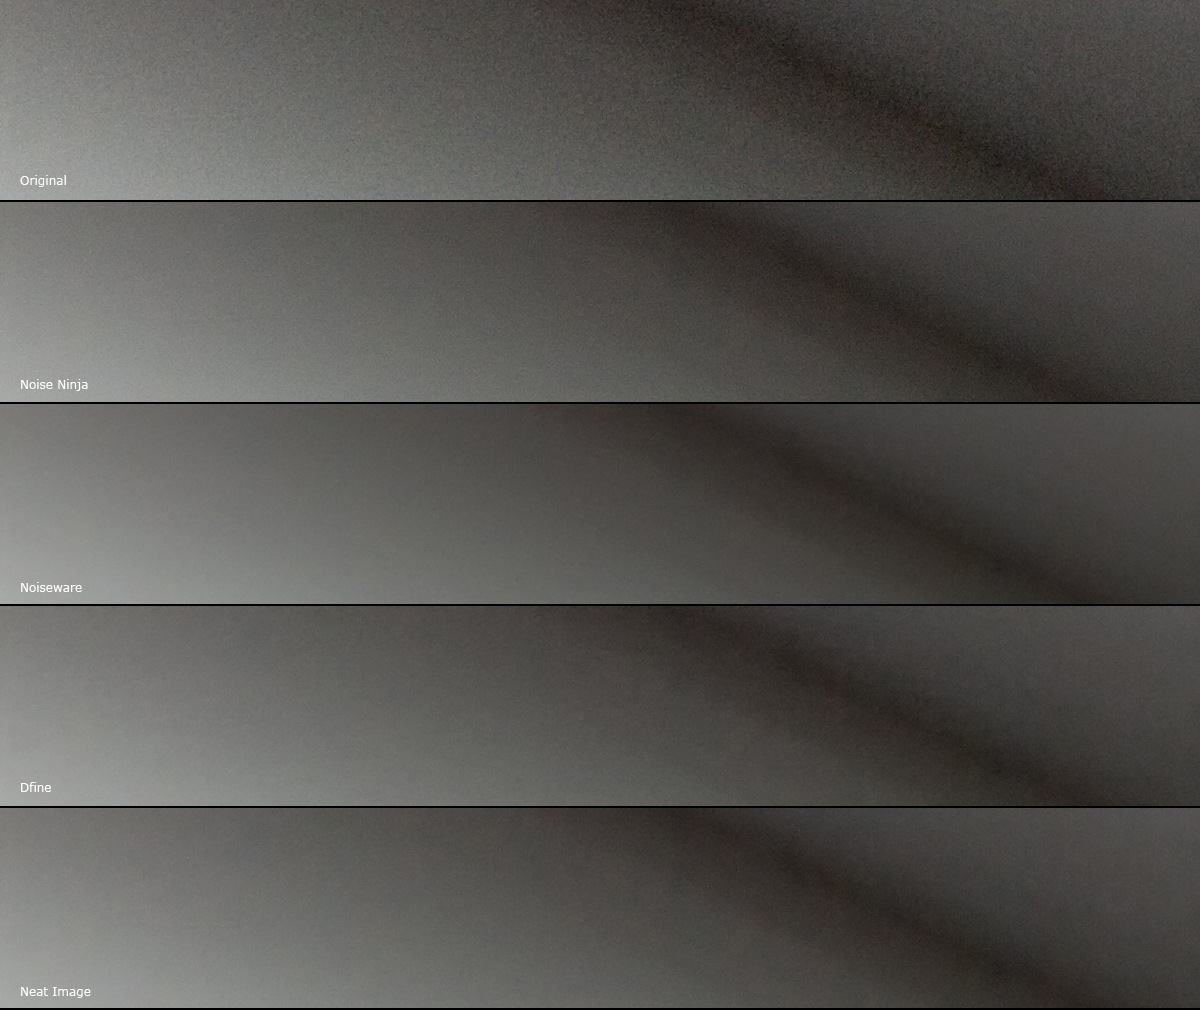
This is a comparison of noise in the tonal gradient across the top of the photo.

This photo was taken at Zapata Falls, near the Great Sand Dunes National Monument in Colorado. My camera was accidentally set to ISO 800, which made most of the photos useless in the end, so I’m glad to be able to use them for something.
This is actually one of several bracketed exposures that were destined for HDR processing, but it this one has plenty of noise and more overall detail than the rest.The shadows in this photo have been brought up a bit with Camera Raw’s “Fill Light”, which of course, makes the noise even more prominent in those areas (most of the image).
With automatic processing, I found that none of the programs were really able to handle this image; it became a mess of watercolor-like blotches and smears. Some were better than others, though. The ice sheets in the foreground left were relatively easy to clean up, although the darker areas did not clean as well as the mids. The detail in the rock in the top center was very quickly lost, and there were various amounts of degradation of the detail that was still present in the highlight water.
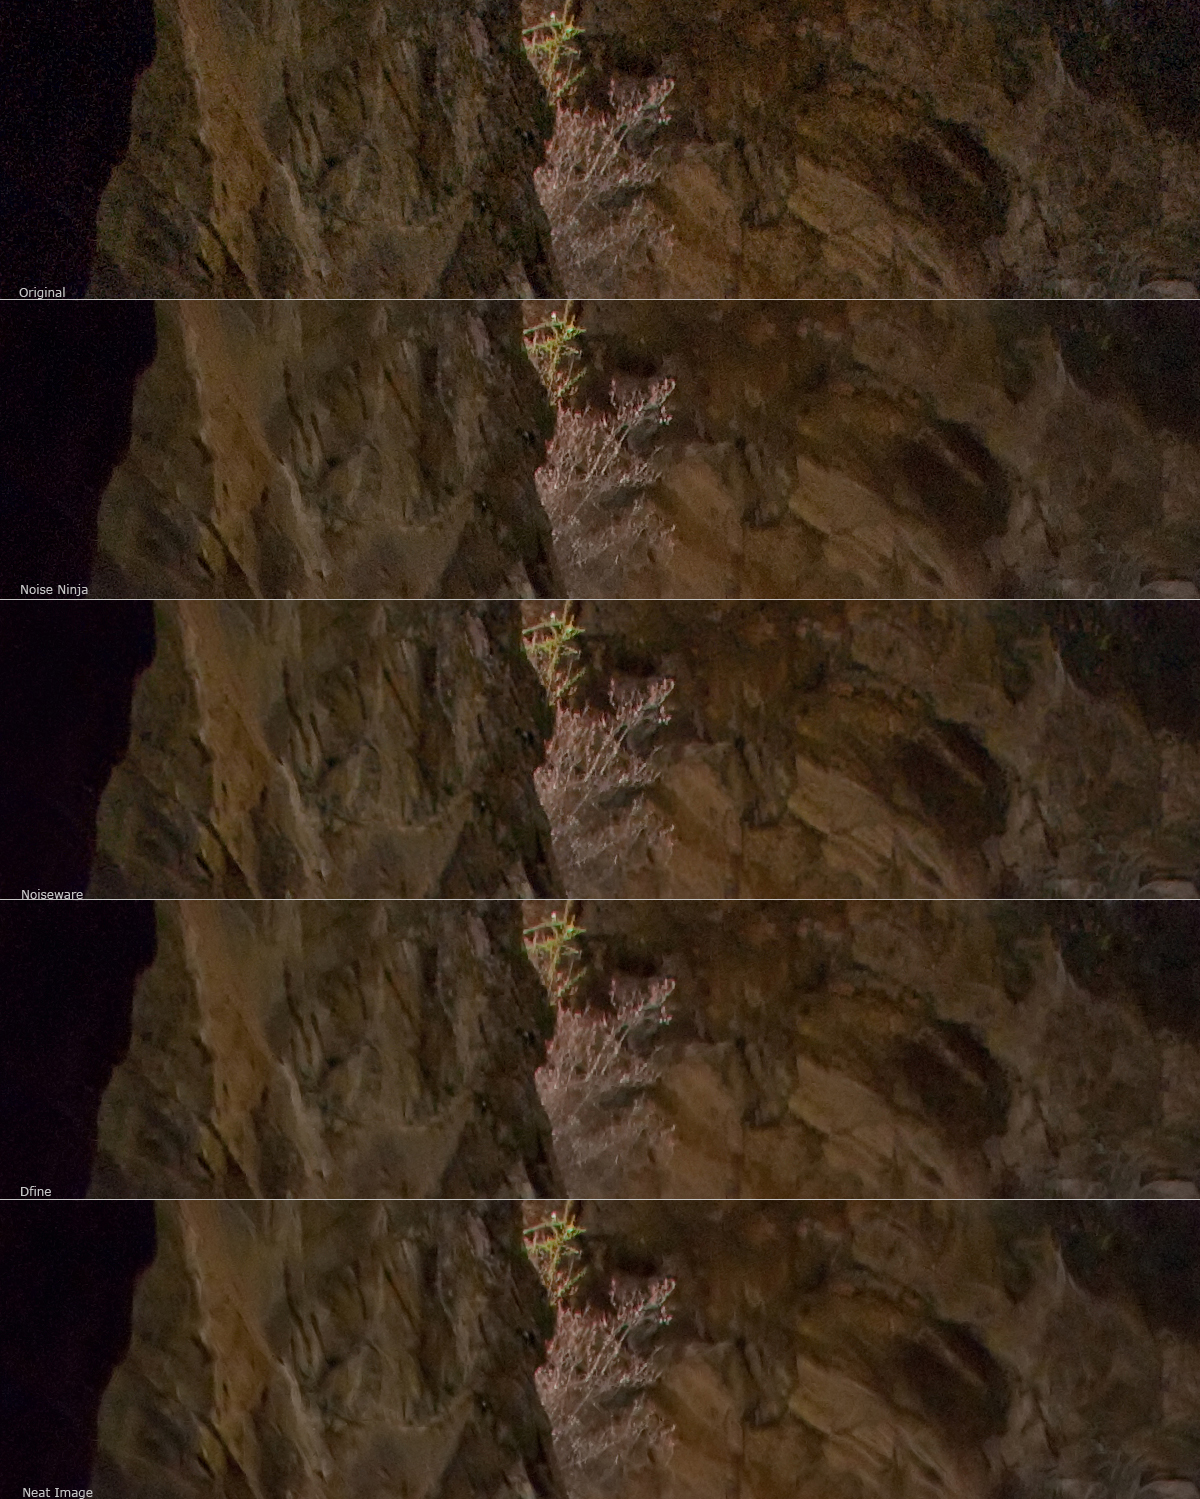
The next set shows the noise in the ice and some of the highlight detail. It was interesting to find that the detail in the water actually appears sharper in the Noise Ninja rendering than in the original, most likely owing to NN’s light application of unsharp mask.


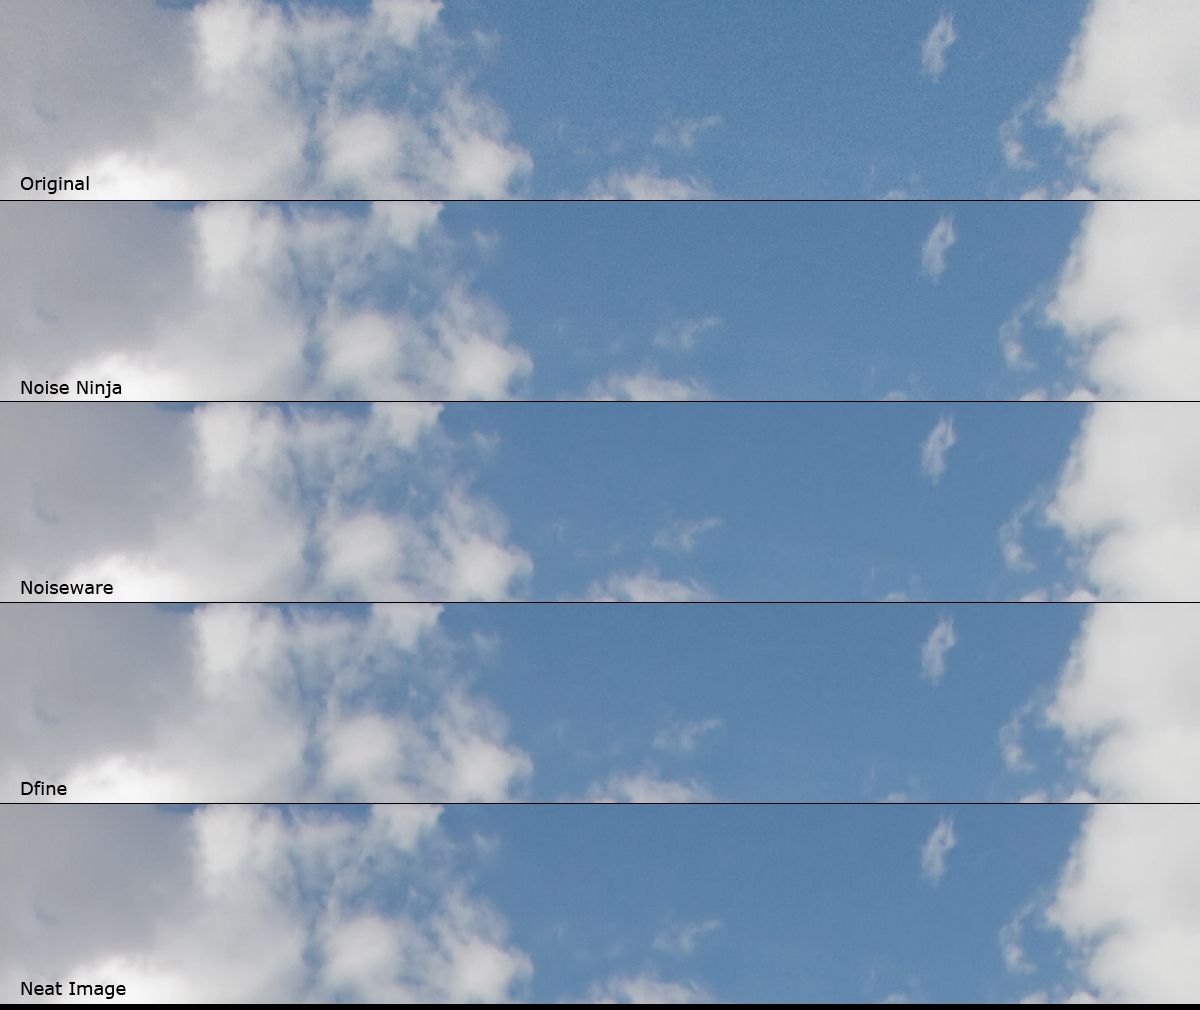
This image is tricky. This sand dune has, in parts, a grainy texture, as you might expect. Of course, there are only small parts of the image in which the sand texture is similar in size to the digital noise, but with auto-profiling, this can be problematic… and that is exactly the point of using this image. Same camera, ISO 800, but since it was bright with a fast shutter speed, the noise is less problematic, though still certainly present. The sky is the most obvious region to get a baseline judgment on the noise.
Full automatic processing was predictably messy in the sand, but also surprisingly poor in the sky. I sampled a section of the sky that contained plenty of wispy little bits that would not survive heavy handed noise reduction, and in most cases, they survived just fine.
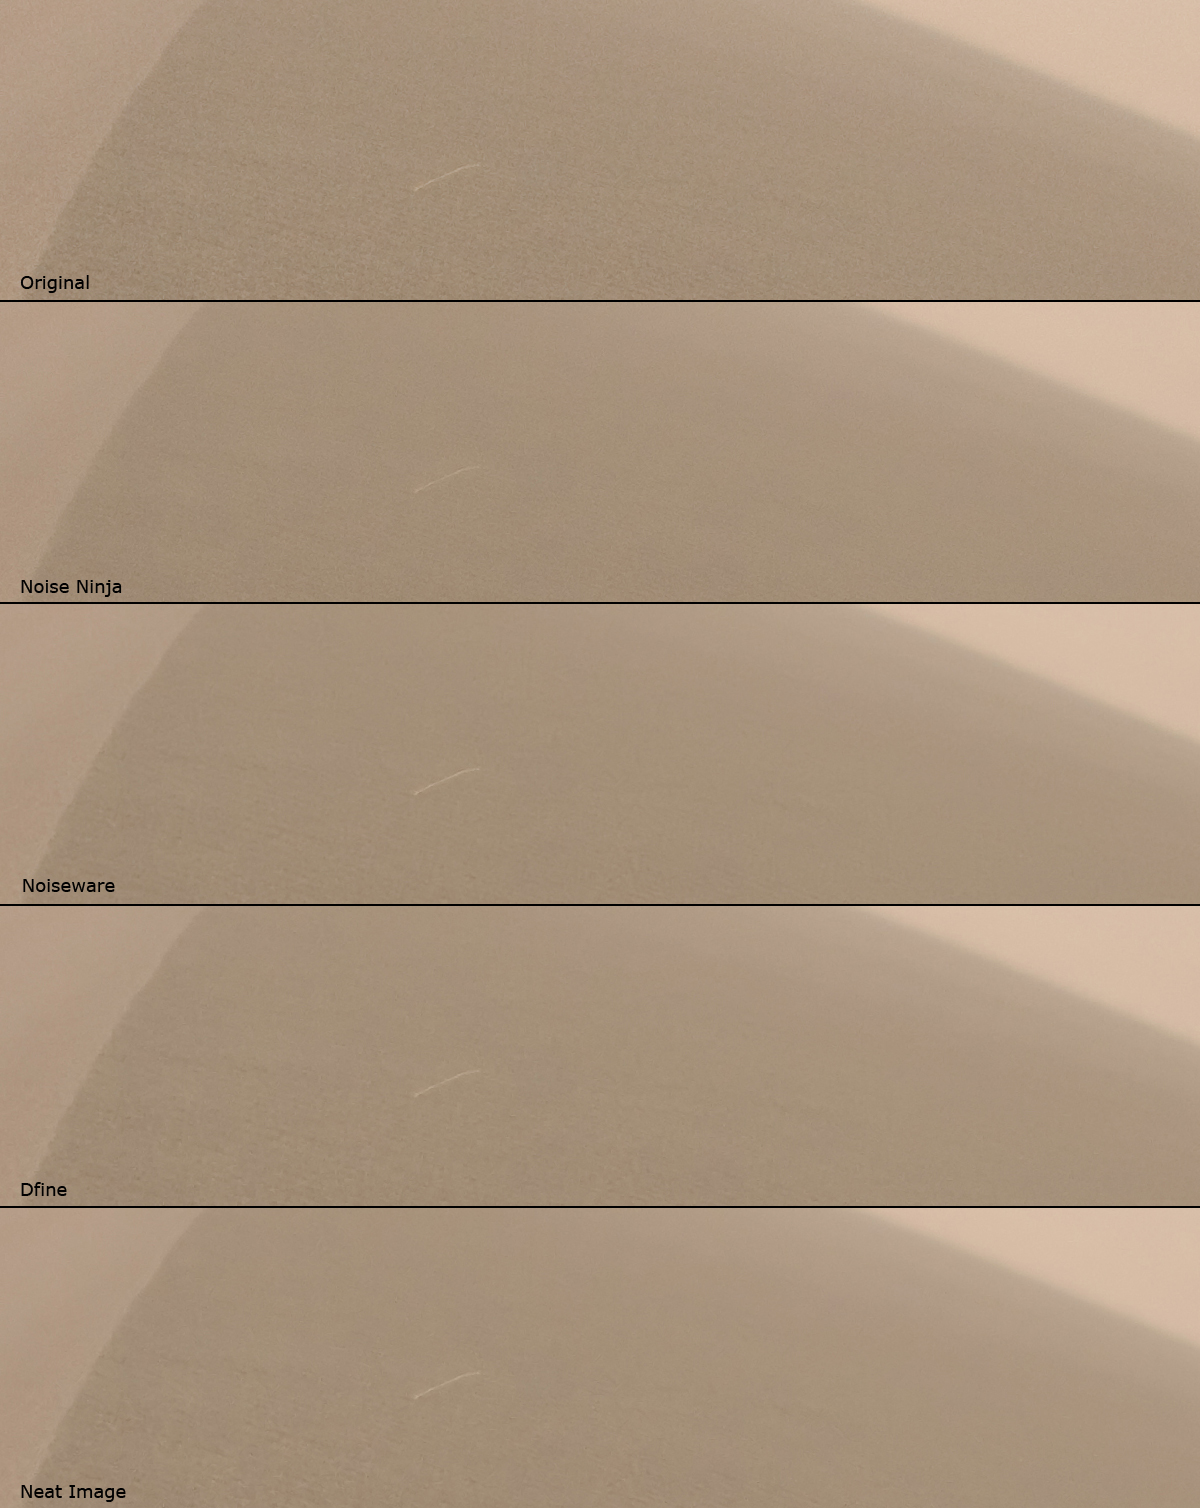
In the second set of photo slices (viewed at full resolution), you’ll notice a blade of grass sticking out of the sand. In the original photo, there is an obvious pattern in the sand: diagonal, down to the right, although the sand itself was too far away to have any true sandy texture. I hoped for the texture to go mostly smooth but for the pattern to remain.
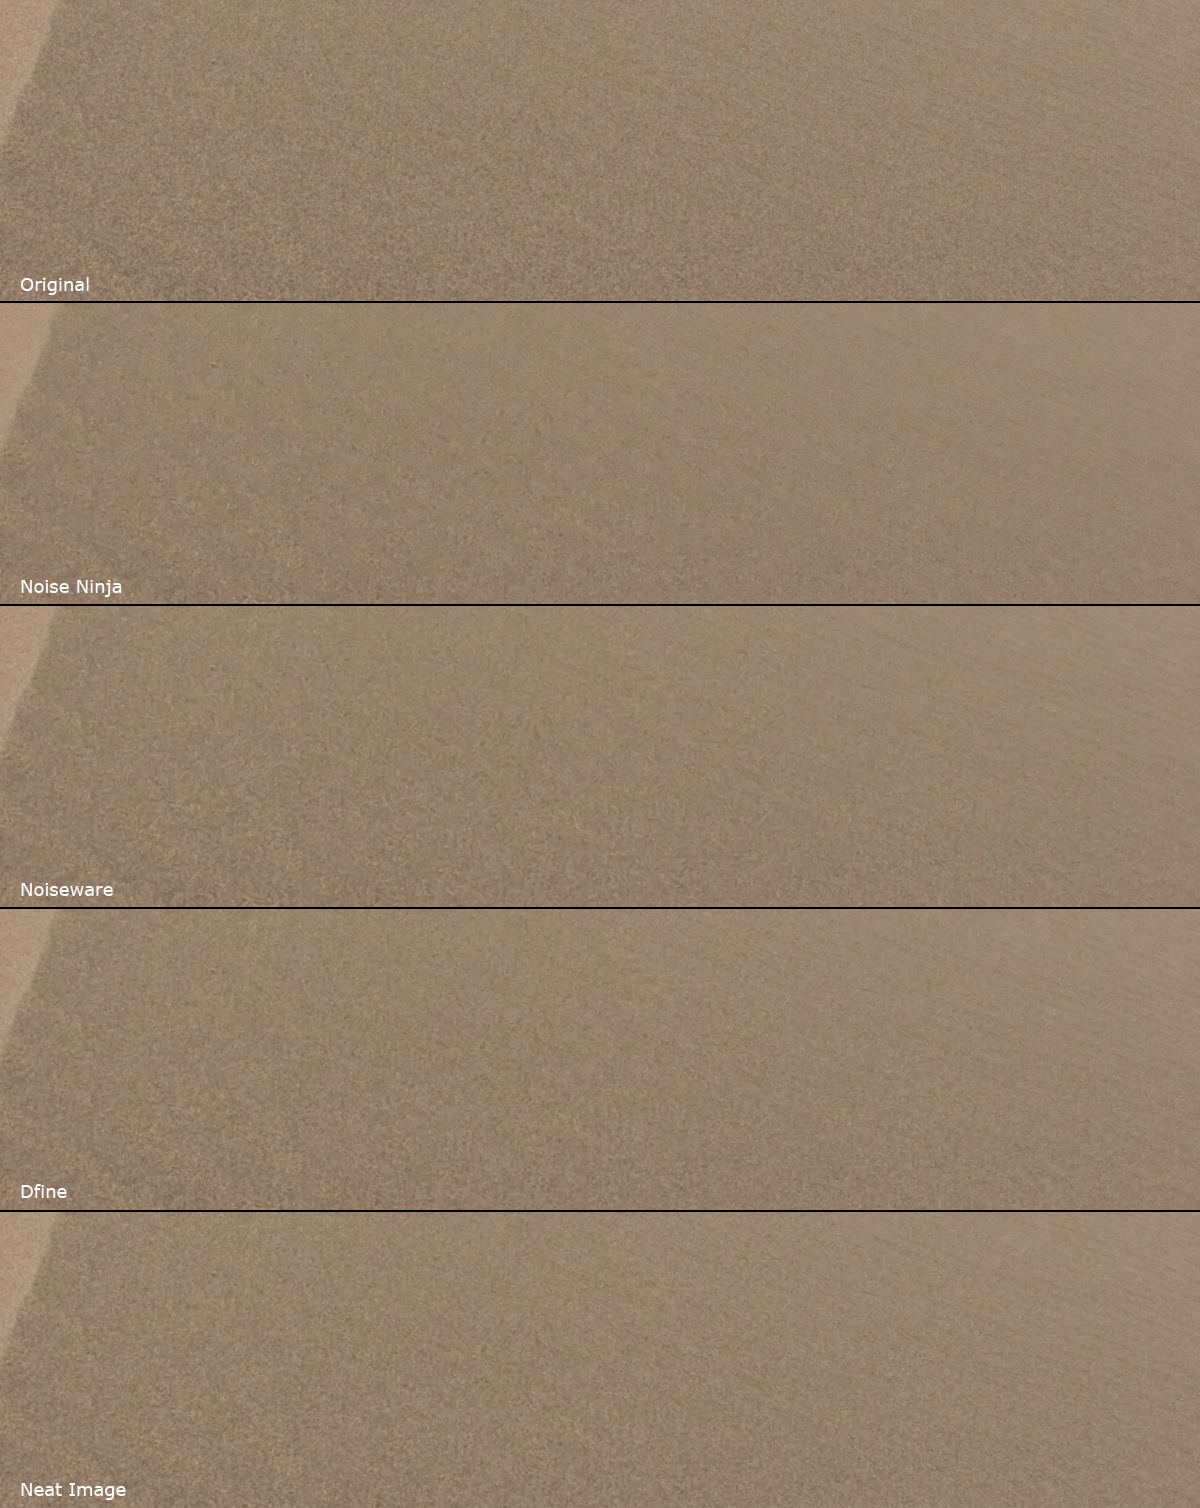
The most surprising thing about this test was how horribly noise Ninja performed on the mid-foreground sand… so horribly that it’s even visible at only 50% magnification. In fact, I’m adding a third set of photos just because it’s so unusual. I’ve reduced the following photos to 66.7% to show the larger scale patterns that emerge.
Coming soon. In the meantime, take a look at the examples and come to your own conclusions! Incidentally, if anyone has actually read this far, let me know… I’m curious to see whether there’s any interest.
